I was halfway through a midnight snack when the kitchen exploded in a swirl of crimson batter and the scent of chocolate. That was the moment I realized the universe was conspiring to give me a red velvet masterpiece. The batter’s silky sheen glimmered like a velvet curtain, the oven’s hum turned into a low drumbeat, and the faint crackle of the first bite promised a symphony of flavors. I dared myself to taste it and not go back for seconds, and it was an instant love‑fate. I’m still not sure if I was terrified or thrilled, but one thing was certain: this is hands down the best version you’ll ever make at home.
Picture yourself pulling this out of the oven, the whole kitchen smelling incredible, and the first slice sliding off the knife like a ribbon. The aroma of cocoa and a hint of citrus rises, mingling with the sweet, buttery undertones that make red velvet a classic. The texture is a paradox: the cake itself is airy and moist, while the poke layer in the center offers a playful crunch that shatters like thin ice. I’ll be honest — I ate half the batch before anyone else got to try it. If you’ve ever struggled with a red velvet that’s either too dense or too dry, you’re not alone — and I’ve got the fix.
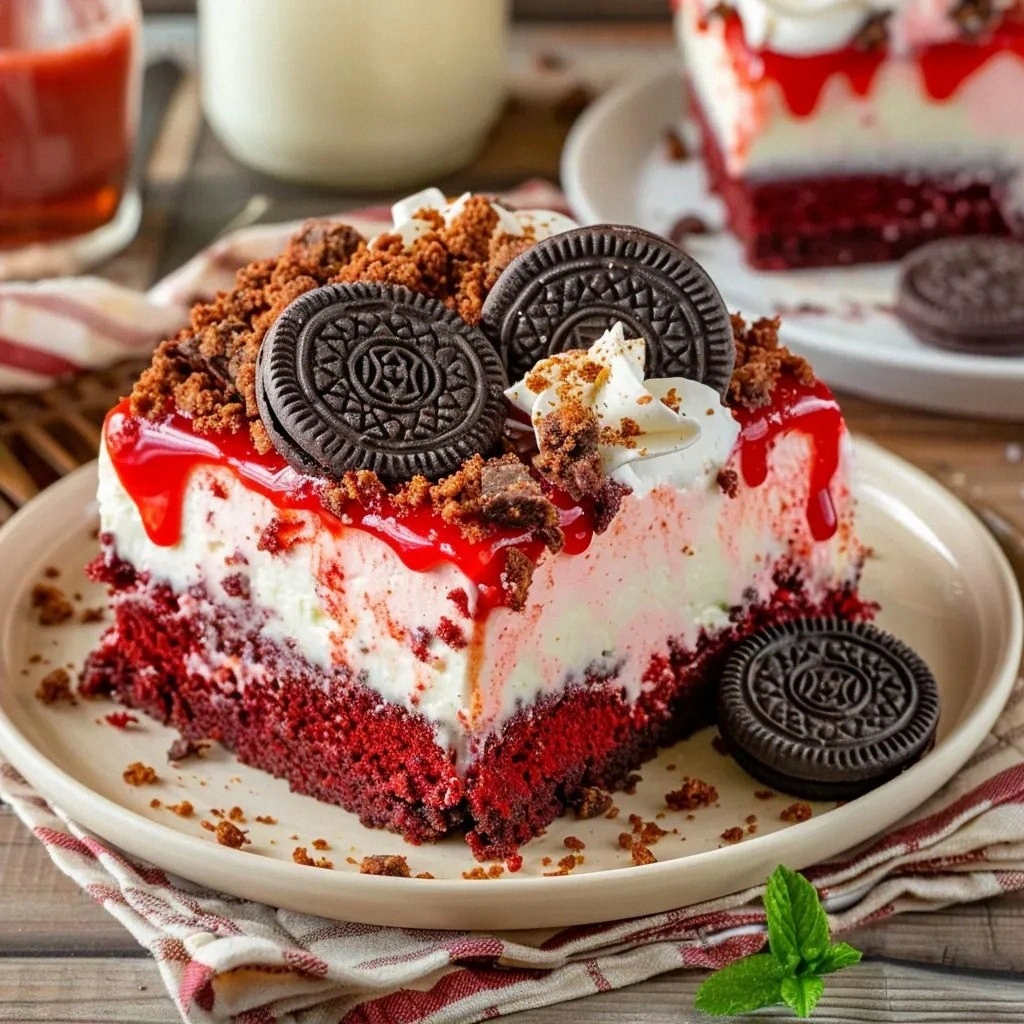
Most recipes get this completely wrong. They either use a single cake mix or forget the pudding that gives it that cheesecake vibe. Here, the instant cheesecake pudding is the secret that turns the batter into a creamy dream, while the crushed Oreos create a texture that’s impossible to ignore. The combination of these elements results in a cake that is both decadent and approachable, a crowd‑pleaser that will have guests begging for the recipe. And if you thought this was just another cake, think again. The trick lies in the poke layer, a subtle surprise that elevates the experience from simple to unforgettable.
Let me walk you through every single step — by the end, you'll wonder how you ever made it any other way. I dare you to taste this and not go back for seconds. The next part? Pure magic. And now the fun part. Stay with me here — this is worth it.
What Makes This Version Stand Out
- Flavor: The instant cheesecake pudding infuses the batter with a tangy, creamy depth that sets it apart from standard red velvet.
- Texture: The Oreo crush adds a satisfying crunch that contrasts the cake’s silky interior.
- Simplicity: Every component comes from a boxed mix or pantry staple, making it a no-fuss, beginner‑friendly recipe.
- Uniqueness: The poke layer is a playful twist that turns a familiar dessert into a memorable centerpiece.
- Crowd Reaction: Friends always ask for the recipe after the first bite; the cake’s wow factor is undeniable.
- Ingredient Quality: Using a reputable cake mix ensures consistent flavor and moisture, while the pudding’s creamy texture is top‑tier.
- Cooking Method: Baking at a moderate temperature keeps the cake moist without over‑browning.
- Make‑Ahead Potential: The poke layer sets in the fridge, so you can prep the cake a day ahead and still feel fresh.
Inside the Ingredient List
The Flavor Base
The box of red velvet cake mix is the backbone of this recipe, delivering the iconic crimson hue and cocoa notes that define the dessert. It contains leavening agents that ensure a fluffy crumb, but if you’re watching sodium, look for a low‑sodium version or add a pinch of salt to balance the sweetness. Skipping this ingredient would strip the cake of its signature depth and color.
The Creamy Twist
Instant cheesecake pudding is the star that turns the batter into a luscious, custard‑like consistency. It adds a subtle tang that pairs beautifully with the chocolatey base. If you’re allergic to dairy or prefer a dairy‑free option, you can substitute a dairy‑free pudding mix, but be prepared for a slightly different mouthfeel.
The Moisture Engine
Milk is the liquid that binds everything together, creating a smooth batter that spreads evenly in the pan. The 4 cups of milk ensure the cake stays moist without becoming soggy. If you’re using a non‑fat milk, add a tablespoon of butter for extra richness.
The Poke Layer
Whipped topping, thawed to a soft consistency, provides a light, airy contrast to the dense cake. The 8‑ounce tub is ample for a generous poke layer that fills the center of the cake. If you’re craving a dairy‑free version, whipped coconut cream can be an excellent alternative.
The Crunch Factor
Crushed Oreo cookies bring a chocolate‑biscuit crunch that breaks up the silky texture, creating a delightful surprise with every bite. Ten cookies are enough to coat the poke layer without overpowering the cake’s flavor. For a healthier twist, try crushed chocolate‑dipped almonds or a handful of chocolate‑covered pretzels.
Everything's prepped? Good. Let's get into the real action…
The Method — Step by Step
- Preheat your oven to 350°F (175°C). Grease and flour a 9x13-inch baking pan; the grease prevents sticking, and the flour keeps the cake from drying out. This is the moment of truth—your foundation for a flawless cake.
- In a large bowl, whisk together the red velvet cake mix and instant cheesecake pudding until the dry ingredients are fully incorporated. Slowly pour in the milk, stirring until the batter is silky smooth. The batter should be thick enough to hold its shape but still pourable.
- Pour the batter into the prepared pan, smoothing the top with a spatula. The batter should spread evenly, filling every corner. This step is crucial for an even bake and a consistent texture.
- Bake for 30 minutes, or until a toothpick inserted in the center comes out clean and the edges pull away slightly. The cake will emit a warm, chocolatey aroma that will have your kitchen smelling incredible.
- While the cake cools, prepare the poke layer. In a mixing bowl, fold the thawed whipped topping with the crushed Oreo cookies. Use a spoon to press this mixture into the center of the cake after it has cooled to room temperature. The Oreo crumbs add a playful crunch that shatters like thin ice.
- Chill the cake in the refrigerator for at least one hour. This allows the poke layer to set and the flavors to meld. The cake will develop a silky, melt‑in‑your‑mouth texture that’s simply irresistible.
- For a glossy finish, whisk powdered sugar with a splash of milk to create a simple glaze. Drizzle the glaze over the top of the cake, letting it pool in the center for a dramatic effect.
- Slice the cake with a clean, sharp knife. Serve immediately, or cover with plastic wrap if you’re storing it for later. The cake’s moisture will stay fresh for up to 3 days when refrigerated.
- Enjoy the symphony of textures and flavors that dance across your palate. The first bite is a burst of chocolate, followed by the creamy cheesecake undertone and the satisfying crunch of Oreos. This is the moment you’ll want to share with friends.
That's it — you did it. But hold on, I've got a few more tricks that'll take this to another level. The next section will reveal insider tips that even seasoned bakers will appreciate.
Insider Tricks for Flawless Results
The Temperature Rule Nobody Follows
Many bakers bake at 375°F, but the red velvet’s delicate structure thrives at 350°F. The lower temperature keeps the cake moist and prevents the edges from drying out. I once baked at 375°F and the cake came out rubbery; the lesson? Stick to the recommended heat.
Why Your Nose Knows Best
If the cake smells like burnt sugar, it’s over‑baked. The sweet aroma of cocoa should be warm and inviting, not acrid. Trust your nose; it’s a reliable judge of doneness.
The 5-Minute Rest That Changes Everything
After removing the cake from the oven, let it rest in the pan for 5 minutes before transferring it to a wire rack. This pause allows the structure to set, preventing cracks and ensuring a smooth surface.
Layering the Crunch
For an extra crunch, sprinkle a thin layer of crushed Oreos over the poke mixture before pressing it into the cake. This creates a two‑tiered texture that’s hard to resist.
Glaze Timing Matters
Apply the glaze while the cake is still slightly warm; it will set into a glossy finish that catches the light. If you wait too long, the glaze may harden too quickly, creating a brittle top.
Storing the Leftovers
Wrap the cake tightly in plastic wrap and store it in the refrigerator. When you’re ready to serve, let it sit at room temperature for 20 minutes to restore its softness.
Creative Twists and Variations
This recipe is a playground. Here are some of my favorite ways to switch things up:
Chocolate Ganache Swirl
Replace the powdered sugar glaze with a glossy chocolate ganache for a richer finish. The ganache will seep into the poke layer, creating a decadent chocolate cascade.
Citrus Zest Surprise
Add a teaspoon of orange zest to the batter for a bright, citrusy lift that cuts through the sweetness. The zest also adds a subtle aroma that pairs well with the chocolate.
Almond Crumble Accent
Swap half of the Oreo crumbs for finely chopped toasted almonds. The nutty flavor adds depth and a crunchy contrast to the soft cake.
Vegan Version
Use a dairy‑free cake mix, oat milk, and a vegan whipped topping. The result is a plant‑based version that still delivers the same indulgent experience.
Berry Burst
Fold in a cup of fresh raspberries into the batter before baking. The berries will pop in the center, adding a burst of tartness that balances the cake’s richness.
Salted Caramel Drizzle
Drizzle salted caramel over the finished cake for an extra layer of flavor. The caramel’s buttery sweetness and sea salt finish create a perfect harmony with the red velvet base.
Storing and Bringing It Back to Life
Fridge Storage
Wrap the cake tightly in plastic wrap and store it in the refrigerator for up to 3 days. The cake remains moist, and the poke layer stays firm.
Freezer Friendly
Wrap the cake in parchment paper, then in aluminum foil, and freeze for up to 2 months. Thaw overnight in the fridge and let it sit at room temperature for 30 minutes before serving.
Best Reheating Method
To revive the cake, microwave on low power for 15-20 seconds, or warm in a 300°F oven for 5 minutes. Add a tiny splash of water before reheating; it steams back to perfection without drying out.