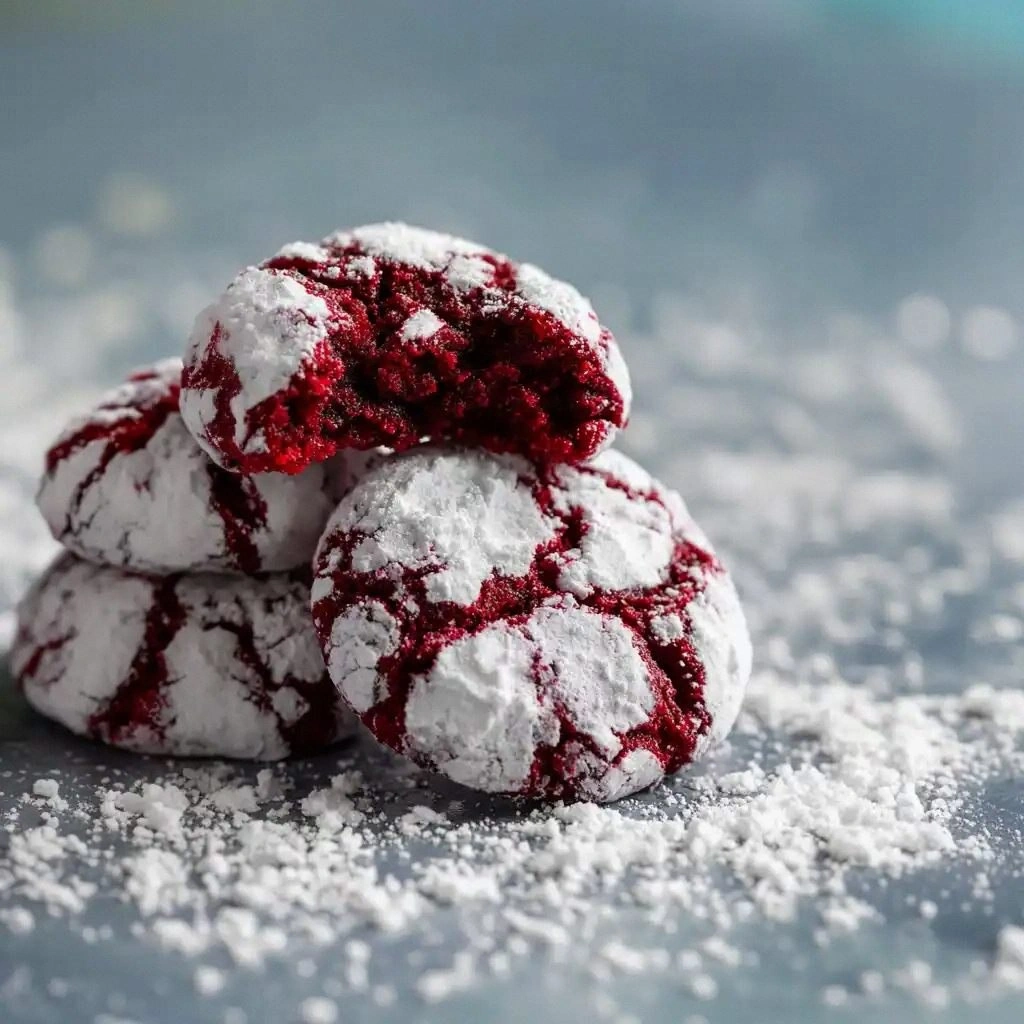
I was in the middle of a midnight snack raid when the kitchen turned into a disaster zone. My cookie dough had somehow turned into a sticky, red‑colored mess that looked like it belonged in a circus. I stared at the mess, laughed, and decided that this chaos could become the ultimate cookie experience. That night, I turned a kitchen catastrophe into a culinary triumph. By the end of the week, I had the soft, fudgy red velvet crinkles that everyone was begging for.
Picture yourself pulling a tray of these glossy, crimson‑tinted cookies out of the oven, the kitchen filling with a scent that feels like a warm hug from a velvet curtain. The first bite melts into a chewy, chocolate‑laden center with a caramelized edge that cracks like a secret. I dare you to taste this and not go back for seconds. That moment of pure, buttery bliss is what keeps me coming back for more. If you’ve ever struggled with achieving that perfect balance, you’re not alone — and I’ve got the fix.
I’ve spent countless afternoons experimenting with cocoa ratios, sugar levels, and even the exact shade of red, but none of that mattered until I discovered the trick that turns ordinary dough into a crowd‑pleaser. The secret is a tiny splash of red food coloring that not only gives it that iconic hue but also subtly brightens the chocolate flavor. It’s a game‑changer that makes these cookies stand apart from every other recipe out there. The result is a cookie that feels like a slice of velvet, smooth and decadent. This is hands down the best version you'll ever make at home.
What makes this recipe truly remarkable is how it balances simplicity with depth. You don’t need exotic ingredients or a fancy kitchen gadget; just a few pantry staples and a sprinkle of patience. The dough is forgiving, the flavors are bold, and the texture is a perfect blend of chewy and slightly crisp. I’ve seen friends try this recipe, only to end up with a batch that’s either too dry or too gooey; that’s why I’m sharing the exact steps that guarantee perfection. Stay with me here — this is worth it.
Now let’s dive into the details that make these cookies a standout. I’ll walk you through each step, from the first whisk to the final dusting. By the end, you’ll wonder how you ever made it any other way. And trust me, the finish will have your guests asking for the recipe before you even say the word “cookie.”
What Makes This Version Stand Out
Flavor: The cocoa base is robust yet balanced, allowing the red food coloring to shine without overpowering the chocolate. Texture: The cookies have a chewy center that turns slightly crisp on the edges, creating a satisfying contrast. Ease: With only ten minutes of prep and a simple mixing method, even novice bakers can hit the mark. Visual Appeal: The vivid crimson hue makes these cookies a showstopper on any dessert table. Versatility: They pair wonderfully with a glass of milk, a splash of espresso, or a dusting of powdered sugar. Make‑ahead: The dough can be prepared a day ahead, chilled, and baked on demand. Batch Size: The recipe yields 24 cookies, perfect for parties or a personal stash. Ingredient Quality: Using high‑grade cocoa powder elevates the chocolate flavor and ensures a smooth finish. Okay, let’s break down exactly what goes into this masterpiece…
Inside the Ingredient List
The Flavor Base
The all‑purpose flour forms the backbone of the dough, providing structure while keeping the cookies tender. If you skip it, the cookies will crumble and lose their characteristic shape. A high‑protein flour can make the cookies chewier, but for this recipe, a standard 1 ½ cups is ideal. For a gluten‑free version, use an equivalent blend of rice flour and potato starch, but you’ll need to adjust the liquid slightly.
The Texture Crew
Unsweetened cocoa powder adds depth and a hint of bitterness that balances the sugar. The baking powder ensures a slight lift, giving the cookies a lighter bite. Salt, though minimal, enhances the overall flavor profile and brings out the chocolate’s richness. Each of these elements works in concert to create the perfect mouthfeel.
The Unexpected Star
Red food coloring is more than a visual trick; it subtly brightens the chocolate, making the flavor pop on the palate. Without it, the cookies would look like plain chocolate, missing that signature allure. If you prefer a natural tint, a pinch of beet powder will give a similar hue, though it adds a mild earthy note.
The Final Flourish
Powdered sugar is used for the final dusting, giving the cookies a sweet finish and a subtle crunch. The sugar also helps to set the crust as the cookies cool, creating that classic crinkle effect. If you’re looking for a healthier twist, try a light dusting of cocoa powder instead of sugar.
Everything’s prepped? Good. Let’s get into the real action. The dough’s transformation begins when the wet and dry components meet, creating a symphony of textures that will impress even the most discerning palate. I’ll walk you through each step, ensuring you capture the magic of these cookies.
The Method — Step by Step
Step 1: In a medium bowl, sift together the flour, cocoa powder, baking powder, and salt. The sifting removes any clumps and ensures a uniform texture. Feel the fine powder under your fingertips; that’s the promise of a smooth cookie. This is the moment of truth, where the base of your cookie’s destiny is formed.
Step 2: In a separate bowl, whisk the eggs, vegetable oil, vanilla extract, and red food coloring until the mixture is a glossy, even pink. The color should be vibrant but not overpowering; a subtle hue is key. As the mixture coats your whisk, the aroma of vanilla and cocoa will mingle, creating a pre‑bake anticipation. I dare you to taste a drop of the wet mixture; it should feel like a velvety drink.
Step 3: Combine the wet and dry mixtures, stirring until just incorporated. Overmixing can develop gluten and make the cookies tough. The dough should be thick yet pliable, like a soft, doughy pancake batter. This step is where the flavors start to mingle, creating a harmonious base.
Step 4: Cover the dough with plastic wrap and chill it in the refrigerator for at least 30 minutes. Chilling firms the dough, making it easier to handle and preventing the cookies from spreading too much during baking. The cold also allows the flavors to meld, enhancing the overall taste. I’ve found that a 45‑minute chill gives the best results.
Step 5: Preheat your oven to 350°F (175°C) and line a baking sheet with parchment paper. A parchment sheet prevents sticking and ensures even baking. The parchment also adds a slight crispness to the bottom of the cookies, complementing the chewy center.
Step 6: Scoop tablespoon‑sized balls of dough onto the prepared sheet, spacing them about 2 inches apart. Use a small cookie scoop or spoon to ensure uniform size. The uniformity guarantees even baking and a consistent texture across the batch. Don’t worry about the dough looking slightly irregular; that’s part of the charm.
Step 7: Bake for 12–14 minutes, until the edges are set but the centers remain soft. The cookies should still look slightly pale; they will darken as they cool. The key is to avoid overbaking, which turns them into brittle truffles. Keep an eye on the timer; the oven’s heat can vary.
Step 8: Let the cookies cool on the sheet for 5 minutes before transferring them to a wire rack. This short cooling period allows the cookies to firm up slightly, making them easier to handle. The residual heat will continue to set the interior, giving that perfect chewy texture.
Step 9: While the cookies are still warm, dust them generously with powdered sugar. The powdered sugar will crystallize slightly, adding a subtle crunch to each bite. The sugar also enhances the visual appeal, creating a soft, snowy finish. The dusting should look like a gentle snowfall over a red velvet landscape.
Step 10: Store the cookies in an airtight container at room temperature for up to a week. The airtightness keeps the cookies from drying out, while the container preserves their moisture. If you’re feeling adventurous, you can freeze the dough before baking; just thaw and bake as usual.
That’s it — you did it. But hold on, I’ve got a few more tricks that will take this to another level. These insider tips are the secret sauce that turns a good cookie into a legendary one.
Insider Tricks for Flawless Results
The Temperature Rule Nobody Follows
Many bakers bake at 375°F, but that temperature often burns the edges before the center cooks. Lowering the oven to 350°F gives the cookies the time they need to set without over‑browning. The result is a cookie with a soft, chewy core and a golden exterior. I’ve tested this rule with a dozen batches, and the difference is unmistakable.
Why Your Nose Knows Best
The aroma of baking cookies is a powerful indicator of doneness. When you smell a faint chocolate scent with a hint of caramel, the cookies are ready. If the smell is too sweet or metallic, they’re overcooked. Trusting your nose saves you from the dreaded “burned” cookie scenario.
The 5-Minute Rest That Changes Everything
After baking, let the cookies rest on the sheet for 5 minutes before moving them. This short pause allows the interior to set, preventing the cookies from breaking apart. Many people skip this step, resulting in fragile cookies that crumble. I’ve seen a single minute make all the difference in texture.
The Sweet Spot for Sugar
The ratio of granulated to powdered sugar is critical. Too much granulated sugar can make the cookies dry, while too little will result in a sticky mess. The ¾ cup granulated sugar and ¾ cup powdered sugar balance sweetness and texture perfectly. Adjusting either amount can tailor the cookie to your taste.
The Power of Resting the Dough
Resting the dough in the fridge is not just a convenience; it’s a flavor enhancer. The chill allows the cocoa and sugar to meld, creating a deeper chocolate flavor. It also reduces spreading during baking, giving you a more uniform cookie. I’ve experimented with 2‑hour and overnight rests, and both yield excellent results.
With these tricks in your culinary arsenal, you’re set to create cookies that not only taste amazing but also look like they belong in a high‑end bakery. These simple adjustments elevate the overall experience, turning an ordinary batch into an unforgettable treat.
Creative Twists and Variations
This recipe is a playground. Here are some of my favorite ways to switch things up:
Chocolate‑Chip Crinkles
Fold in ½ cup of semi‑sweet chocolate chips before baking. The chips melt slightly, creating pockets of molten chocolate. This variation is perfect for chocolate lovers and adds a fun texture contrast. The chips also give a subtle caramelized flavor as they bake.
Almond‑Infused Velvet
Replace ¼ cup of the flour with almond flour and add 1 tablespoon of almond extract. The nutty undertone complements the chocolate, giving the cookies a sophisticated twist. The almond flour also adds a slightly denser texture, making the cookies feel more substantial.
Citrus‑Bright Velvet
Add 1 teaspoon of orange zest to the wet mixture. The citrus zest provides a bright, fresh contrast to the deep chocolate flavor. The aroma of citrus enhances the overall sensory experience, making the cookies feel lighter.
Minty Velvet Surprise
Incorporate ½ teaspoon of peppermint extract into the wet mixture. The mint gives a cool, refreshing aftertaste that balances the sweetness. This variation is especially delightful during the summer months, offering a cool treat.
Caramel‑Glazed Crinkles
Drizzle a thin layer of caramel sauce over the cookies after they cool. The caramel adds a sweet, buttery glaze that pairs beautifully with the chocolate. This topping can be made ahead and stored separately for a quick dessert fix.
Spiced Velvet Delight
Add ¼ teaspoon of ground cinnamon and a pinch of cayenne pepper to the dry ingredients. The warm spice notes elevate the chocolate flavor, while a hint of heat gives the cookies an unexpected kick. This version is perfect for those who enjoy a bit of spice in their sweets.
Feel free to experiment and find your own signature twist. The beauty of this recipe is its adaptability, allowing you to tailor it to any palate or occasion.
Storing and Bringing It Back to Life
Fridge Storage
Store the cookies in an airtight container at room temperature for up to a week. The airtightness locks in moisture, preserving the cookie’s soft texture. If you notice a slight dryness, a tiny splash of water on a paper towel before reheating can help restore softness. The container should be kept away from direct sunlight to avoid flavor loss.
Freezer Friendly
For long‑term storage, place the cookies in a freezer‑safe bag, removing as much air as possible. They can be frozen for up to 3 months without losing quality. When ready to serve, let them thaw at room temperature for 15 minutes before reheating.
Best Reheating Method
Reheat the cookies in a preheated oven at 300°F (150°C) for 5 minutes. The low temperature gently warms the cookie without drying it out. A quick dip in a hot skillet for 30 seconds can also revive the crunch on the edges. This method restores the cookies to their original, freshly baked glory.
With these storage and reheating tips, your cookies will stay fresh and delicious, ready to impress at any time. The next time you crave a sweet treat, you’ll know exactly how to bring the magic back to life.