I still remember the exact moment I burned down half a batch of marshmallows over a campfire and ended up with something that tasted like a peanut butter cup had a wild night with a s’more. The smoke was thick, the laughter louder, and the sticky mess in my hands was the single best accidental dessert I’d ever tasted. Fast-forward through three weeks, five bags of chocolate chips, and one very patient dog who learned to beg in perfect harmony with the smoke alarm, and I finally nailed the formula. These Peanut Butter Choc Chip S’mores aren’t just a mash-up; they’re the dessert equivalent of your favorite playlist—every note you love, remixed into something you can’t stop humming.
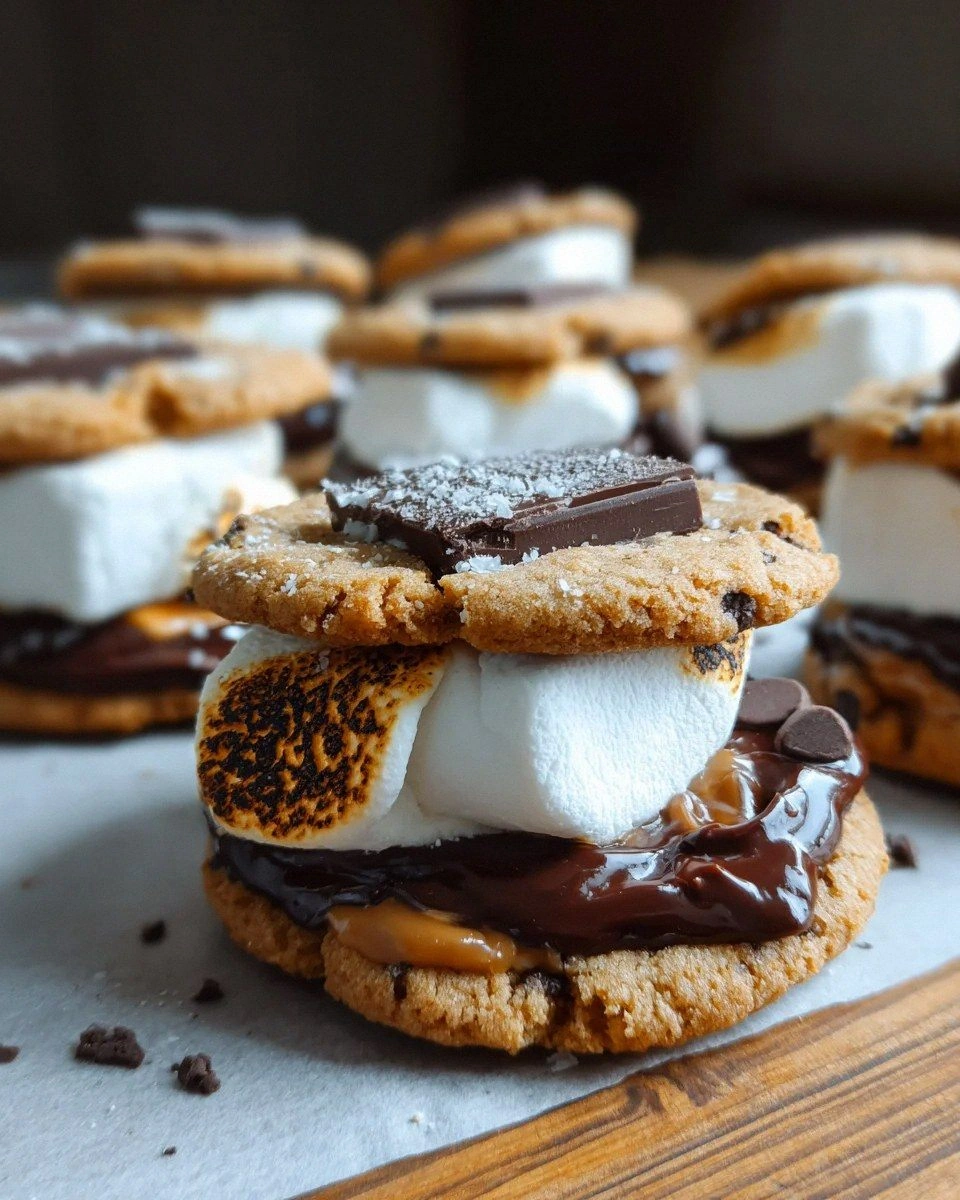
Picture this: a peanut butter cookie that’s soft in the middle with crispy lacy edges, studded with melty chocolate chips, hugging a roasted marshmallow and a square of dark chocolate that’s just surrendered to the heat. The aroma is pure nostalgia on steroids—campfire smoke, roasted nuts, warm vanilla, and that unmistakable sugar-caramel perfume that drifts through the kitchen and makes neighbors suddenly “drop by” for a cup of sugar they never take home. One bite and you get crunch, chew, goo, and a river of molten chocolate that stretches like a guilty secret. I dare you to taste this and not go back for seconds. Actually, I’ll be honest—I ate half the batch before anyone else got to try it, and I’m only a little sorry.
Most recipes get this completely wrong. They either go too sweet (marshmallow plus candy-bar chocolate plus sugar-bomb cookie equals instant toothache) or they forget the salt, leaving the whole thing tasting like a kindergarten craft project. The fix is a cookie that carries a gentle savory edge, chocolate that leans dark and bitter, and marshmallows roasted until they blister and caramelize, not just puff into sugary balloons. Stay with me here—this is worth it. Okay, ready for the game-changer? We’re baking the cookies on the edge of under-done so they stay pliable when we sandwich in the hot fillings. No crumbly shrapnel, no sliding roof of cookie—just soft walls that hug the mess.
Let me walk you through every single step—by the end, you’ll wonder how you ever made it any other way.
What Makes This Version Stand Out
- Flavor Whiplash: Salty-sweet peanut butter cookies meet bitter dark chocolate and smoky marshmallow, so every bite flips your taste buds from “more please” to “whoa, did that just happen?”
- Texture Wonderland: Crispy cookie rim, soft chewy center, gooey marshmallow strand, and a river of melted chocolate—basically a theme park you can eat.
- One-Bowl Cookie Dough: No mixer, no chilling, no fancy gear. If you’ve got a fork and a bowl you’re already halfway to dessert glory.
- Indoor S’mores Hack: No campfire? No problem. A quick broil or kitchen torch gives you that campfire char without the mosquitoes or smoky hair.
- Make-Ahead Magic: Cookies freeze beautifully pre- or post-bake, so spontaneous midnight cravings just became totally manageable.
- Universal Crowd Control: Kids lose their minds over the marshmallows, adults swoon over the dark chocolate, and nobody realizes you sneaked in whole-grain flour because the flavor is that distracting.
- Low-Stress Assembly: We’re not building a skyscraper here—slap, stack, squish, eat. The cookie is your edible napkin.
Alright, let’s break down exactly what goes into this masterpiece...
Inside the Ingredient List
The Flavor Base
Creamy peanut butter is the star of the show, giving a rich flavor and soft texture. Don’t shy away from using chunky peanut butter for an added crunch! You want the kind that’s lightly salted—salt is the invisible conductor that makes every other note sing louder. Skimp here and the cookies taste flat; go overboard with sugar-added PB and you’ll be chasing sweetness the whole time.
Granulated sugar sweetens the cookies beautifully and adds a lovely golden crust during baking. Brown sugar would tilt the flavor into butterscotch territory and overshadow the peanut punch, so we stay classic. A modest amount keeps the cookie from turning into brittle, ensuring it stays pliable enough to fold around the fillings.
Vanilla extract is the aromatic elevator. Even though only a teaspoon goes in, it rounds out sharp edges and convinces everyone you’re a baking wizard. Splurge on the real stuff; imitation vanillin tastes like a candle shop fire-sale and will haunt your dessert faster than you can say “off-flavor”.
The Texture Crew
Large egg acts as a binder, helping the cookies hold their shape while giving them a moist interior. Cold eggs can seize the peanut butter, so leave it on the counter while you gather everything else. No egg? A flax “egg” works, but you’ll lose some of that plush crumb that makes these sandwiches luxurious.
Semi-sweet chocolate chips melt into the cookies, offering pockets of luscious chocolate goodness with every bite. Reach for chips with at least 50% cacao so they stay assertive against the marshmallow sugar wave. Mini chips disperse more evenly, but regular ones give you those dramatic molten puddles—your call, drama queen.
The Unexpected Star
Dark chocolate squares are the grown-up counterweight. Melting these on the cookies adds a rich depth that perfectly complements the sweetness. Anything above 65% cacao keeps the dessert from tipping into cloying, plus the slight bitterness makes the peanut butter taste nuttier. Break the bar into shards rather than neat squares; more surface area equals faster melt and sexier drips.
The Final Flourish
Large marshmallows are the gooey centers essential for traditional s’mores flair. Roast them until they’re golden for that perfect melt. Jet-Puffed or Dare—both work, but avoid the jumbo campfire ones; they’re too bulky and push the cookie walls apart like an overeager house guest. Pat them dry with paper towel before roasting for a faster, more even blister.
Everything’s prepped? Good. Let’s get into the real action...
The Method — Step by Step
- Heat your oven to 350°F (175°C) and line a sheet pan with parchment that overhangs the edges like a hammock. The overhang is your handle later—no burnt knuckles, no cookie casualties. While the oven wakes up, swirl peanut butter, sugar, egg, and vanilla together with a fork until the mixture looks like velvet icing. Take 30 seconds extra here; the sugar needs to dissolve slightly so the cookies don’t grit like sandcastles.
- Fold in the chocolate chips until they’re evenly speckled through the dough. The dough will be soft and glossy—closer to brownie batter than stiff cookie dough. Resist the urge to add flour; peanut butter sets as it bakes, and extra flour turns the final cookies into hockey pucks. Trust the slump.
- Scoop heaping tablespoon mounds onto the prepared sheet, leaving two inches of breathing room. These cookies spread like gossip at a family reunion. If you crowd them, you’ll end up with one mega-cookie that’s impossible to sandwich later—delicious but not the vibe we’re chasing.
- Bake for 9–11 minutes until the edges are burnished bronze but the centers still look pale and puffy. They’ll appear under-baked—that’s your cue to pull them. The residual heat finishes the job outside the oven, giving you that coveted bendy cookie instead of a snap. Let them cool on the pan for 5 minutes; moving them too early causes mid-air disintegration.
- While the cookies cool, break the dark chocolate bar into thumbnail shards and set them nearby. Turn the broiler on high and arrange marshmallows on a small sheet. Slide them under the broiler for 45–90 seconds. Watch this part like it’s the season finale of your favorite show—marshmallows morph from snow-white to volcanic in a heartbeat.
- Flip half the cookies so their flat bottoms face skyward. Lay a square of dark chocolate on each, then crown with a molten marshmallow. The heat from the marshmallow will start melting the chocolate; help it along by pressing the second cookie on top like a gentle handshake. Give it a mini twist—this anchors the layers and prevents tectonic slide.
- Let the sandwiches rest for 3 minutes. Yes, waiting is torture, but it lets the chocolate reach that lava consistency without nuking your tongue. During this time, the cookies soften ever so slightly, creating a unified bite rather than a layered slip-and-slide. If you’ve ever struggled with fillings escaping, you’re not alone—and I’ve got the fix right here.
- Serve on a cutting board with a serrated knife for dramatic slicing or wrap each s’more in parchment for handheld bliss. The parchment keeps fingers tidy and traps a bit of steam, keeping the cookies tender. If photographing for social media, move fast—marshmallow ropes have a half-life of about 30 seconds before gravity wins.
That's it—you did it. But hold on, I've got a few more tricks that'll take this to another level...
Insider Tricks for Flawless Results
The Temperature Rule Nobody Follows
Room-temperature peanut butter blends seamlessly with sugar, giving you a glossy dough that bakes evenly. Cold PB clumps and can trap sugar crystals, leading to speckled white spots on the cookie surface. If your jar has been living in the fridge (some natural brands recommend it), microwave it for 10-second bursts, stirring between zaps until it flows like thick yogurt.
Why Your Nose Knows Best
When the cookies smell like toasted peanuts and the edges are just pulling away from the parchment, they’re done—even if the centers still look raw. Ovens vary; your nose doesn’t. Pull them and let carry-over heat do the rest. Waiting for visual firmness means you’ve overshot by two minutes and will crunch instead of chew.
The 5-Minute Rest That Changes Everything
After assembling, tent the s’mores loosely with foil for 5 minutes. The gentle steam softens the cookie just enough to mold around the fillings, creating that unified bite reminiscent of bakery ice-cream sandwiches. Skip this and you’ll fight cookie cracks and marshmallow blowouts with every mouthful.
Creative Twists and Variations
This recipe is a playground. Here are some of my favorite ways to switch things up:
Reese’s Rebellion
Swap the dark chocolate for mini peanut butter cups pressed cup-side-down onto the marshmallow. The cup melts into a molten peanut lava river that doubles down on the nutty theme. Reese’s purists will weep tears of joy.
Salted Caramel Sunset
Drizzle a ribbon of thick caramel sauce inside the sandwich and sprinkle a touch of flaky sea salt on top. The salt perks up every layer and the caramel adds a buttery backdrop reminiscent of carnival taffy.
Bananas Foster Bonfire
Add a few slices of ripe banana under the marshmallow before broiling. The banana roasts into candy-sweet coins that pair shockingly well with peanut butter. Think PB&B sandwich, but wearing evening attire.
Chili-Chocolate Maverick
Use chili-infused dark chocolate and a pinch of cayenne in the cookie dough. The heat sneaks up at the end, turning the humble s’more into a conversation piece that demands cold milk and bragging rights.
Gluten-Free Campout
Sub in certified-gluten-free oats blitzed into flour for regular flour. The texture is slightly nubbier, but the flavor stays true, and your GF friends will crown you royalty. Just double-check that every chocolate chip brand is also gluten-free.
Vegan Venture
Use a flax egg, coconut sugar, and vegan marshmallows. Coconut oil stands in for any butter that might lurk in store-bought cookies. The flavor leans tropical, but dipped in espresso, it’s pure midnight nirvana.
Storing and Bringing It Back to Life
Fridge Storage
Wrap each assembled s’more in parchment, then foil, and refrigerate for up to 3 days. The cold tightens the marshmallow, so bring them back to room temp for 20 minutes before serving. For a quick revival, microwave 8 seconds—any longer and the marshmallow inflates like a balloon animal.
Freezer Friendly
Flash-freeze un-assembled cookies on a tray, then transfer to a zip bag with parchment layers; they’ll keep 2 months. Marshmallows freeze fine, but chocolate can bloom. Thaw cookies at room temp for 15 minutes before assembling. Re-warm everything in a 300°F oven for 5 minutes to recreate that fresh-baked vibe.
Best Reheating Method
Oven at 300°F for 6 minutes beats the microwave every time. The cookies regain their bend, the chocolate softens without overcooking, and the marshmallow warms through without turning into a rubbery asteroid. Add a tiny splash of water on the pan before reheating—it steams back to perfection and prevents edges from drying out.