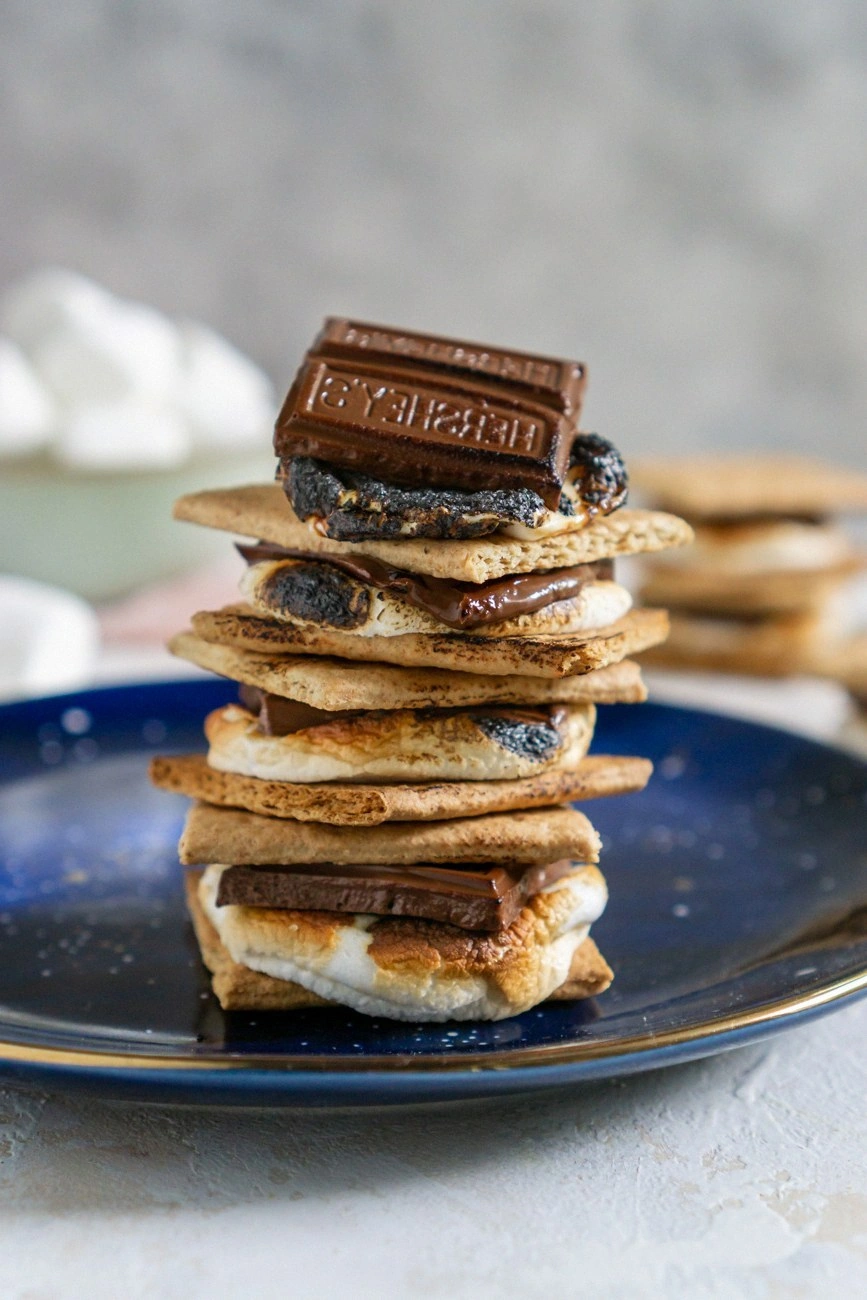
I was halfway through a midnight snack attack, the kitchen lights flickering like a dying campfire, when my friend dared me to turn our abandoned campfire classics into a countertop masterpiece. I laughed, because I had never thought of s'mores as anything more than a sticky, gooey treat you could only make with a blowtorch or a campfire. That night, I stared at a Hershey’s Milk Chocolate Bar, a handful of Honey Maid Graham Cracker Squares, and a stack of marshmallows, and thought, “What if I could melt and bake these in my oven, but with a twist that makes them unforgettable?” The result? A recipe that feels like a campfire in a kitchen, but with a buttery crunch and a melt that drips like a slow, golden river.
Picture the scene: the oven’s preheat hum, the scent of caramelized sugar rising, a faint crackle of the chocolate melting, and the buttery aroma of toasted crackers filling the air. Your fingertips feel the slight heat of a parchment-lined tray, and as you slide the tray in, the kitchen becomes a front‑row seat to a sensory symphony. The first bite is a crunchy bite of a graham cracker, followed by the warm, velvety chocolate, and then the marshmallow’s gooey, almost liquid center. The texture is a delightful contrast—crisp, gooey, and slightly chewy—while the flavors are balanced with a subtle hint of vanilla from the marshmallows and a mild chocolate sweetness that lingers.
This version stands out because it transforms a simple campfire treat into a sophisticated, oven‑baked dessert that can be made in minutes, yet feels like a gourmet experience. It uses a single Hershey’s bar to create a uniform melt that coats each cracker without overpowering the delicate sweetness. The technique of baking the marshmallows just enough to puff them up, then quickly flipping them to caramelize the exterior, gives a depth of flavor that you can’t get from a standard microwave or campfire. Plus, the recipe is so simple that even the most kitchen‑nervous cooks can master it, while still delivering a show‑stopping dessert that will make you the talk of any gathering.
And here’s the kicker you won’t expect: a secret addition of a pinch of sea salt to the chocolate layer that elevates the sweetness into a nuanced, almost savory profile. I dare you to taste this and not go back for seconds. Let me walk you through every single step—by the end, you'll wonder how you ever made it any other way.
What Makes This Version Stand Out
- Taste: The combination of sweet chocolate, salty crackers, and caramelized marshmallow creates a complex flavor profile that feels both nostalgic and luxurious. The subtle sea salt accent on the chocolate lifts the sweetness, giving each bite a refined edge.
- Texture: The graham crackers are crisp yet slightly buttery, the chocolate melts into a silky glaze, and the marshmallows puff to a cloud‑like center that oozes when you bite. The result is a multi‑layered mouthfeel that keeps the palate engaged.
- Simplicity: With only three ingredients, no extra sauces or elaborate prep, this recipe is a breeze for beginners and a quick win for busy evenings.
- Uniqueness: The oven‑baked method eliminates the need for a campfire or blowtorch, yet retains the authentic s'more experience with a crisp crust and molten center.
- Crowd Reaction: Friends who have tried the classic version say this version is hands down the best they’ve ever made at home, and they can’t stop asking for the recipe.
- Ingredient Quality: Using a single Hershey’s Milk Chocolate Bar ensures a consistent melt and rich flavor, while the Honey Maid crackers provide a buttery crunch that complements the chocolate.
- Cooking Method: Baking in the oven gives you full control over the melt and caramelization, eliminating the unpredictable heat of a campfire.
- Make‑Ahead Potential: Once assembled, the s'mores can be stored in the fridge for up to 24 hours and reheated in the oven for a fresh, crisp finish.
Alright, let's break down exactly what goes into this masterpiece...
Inside the Ingredient List
The Flavor Base
The Hershey’s Milk Chocolate Bar is the heart of this recipe. Its creamy, slightly sweet profile melts smoothly, creating a glossy glaze that envelopes each graham cracker. If you skip the chocolate, you lose that velvety mouthfeel and the essential richness that balances the sweet marshmallows and salty crackers. For a richer twist, try a dark chocolate bar—just remember to adjust the salt pinch accordingly.
The Texture Crew
Honey Maid Graham Cracker Squares provide the perfect crunchy foundation. Their buttery, slightly sweet crumb gives way to a crisp exterior when baked, while still holding the melted chocolate without disintegrating. Skipping the crackers would leave you with a gooey mess; the crunch is what gives s'mores their signature bite. If you’re gluten‑free, look for a certified gluten‑free graham cracker brand that keeps the same buttery texture.
The Unexpected Star
Large marshmallows are the secret sauce that turns this simple trio into a decadent dessert. The marshmallows puff up when heated, creating a cloud‑like center that oozes chocolate and caramel when bitten. If you only have mini marshmallows, increase the quantity by 25% to compensate for the smaller size. The marshmallows also add a delightful aroma that makes the kitchen smell like a campfire, even though no fire is involved.
The Final Flourish
A pinch of sea salt on the chocolate layer is the finishing touch that elevates the sweetness into a savory, almost umami profile. Salt is known to enhance chocolate’s flavor, bringing out deeper notes and balancing sweetness. If you prefer a more pronounced salty kick, add an extra pinch or sprinkle a tiny amount of flaky sea salt on top before baking.
Everything's prepped? Good. Let's get into the real action...
The Method — Step by Step
- Preheat the oven. Set your oven to 375°F (190°C) and let it fully preheat while you assemble the layers. This temperature is hot enough to melt the chocolate and puff the marshmallows, but not so hot that it burns the crackers. While the oven warms, place a silicone baking mat or parchment paper on a baking sheet; this will keep the s'mores from sticking and make cleanup effortless.
- Crack and break. Break the Hershey’s Milk Chocolate Bar into bite‑sized chunks that will melt evenly. If you prefer a smoother melt, place the chocolate in a heat‑proof bowl and melt it gently in the microwave for 15–20 seconds, stirring until glossy. The chocolate should be liquid but not too runny; you want a glaze that coats the crackers without dripping off.
- Lay the base. Arrange the Honey Maid Graham Cracker Squares in a single layer on the prepared baking sheet. Make sure they’re not touching; spacing allows the heat to circulate evenly and prevents the crackers from becoming soggy. If you have a larger sheet, you can double the quantity for a batch that serves more people.
- Marshmallow prep. Place the large marshmallows on top of the crackers, leaving a small gap between each one. They’ll puff up during baking, so give them room. If you’re using mini marshmallows, increase the number by 25% to maintain the same volume of gooey center.
- First bake. Slide the sheet into the preheated oven and bake for 8–10 minutes, or until the marshmallows have puffed and the chocolate has melted into a glossy sheen. The oven’s heat should cause the marshmallows to puff like tiny clouds, while the chocolate should start to ooze slightly. Watch for the first signs of caramelization—tiny brown spots on the marshmallow surface.
- Flip the s'mores. Carefully remove the sheet and flip each s'more over, using a spatula to keep the marshmallows intact. This step caramelizes the outer layer of the marshmallow, giving it that signature golden crust. Be gentle; the marshmallows are still soft and can tear if handled roughly.
- Second bake. Return the sheet to the oven for an additional 4–6 minutes, or until the marshmallow tops are golden brown and the chocolate has set into a firm glaze. The final bake should leave the chocolate slightly tacky on the outside, indicating a perfect balance of melt and firmness.
- Cool and serve. Let the s'mores cool on the sheet for 5 minutes before transferring them to a wire rack. This resting period allows the chocolate to set fully and the marshmallow to firm up slightly, making each bite easier to handle. Serve immediately, or store in an airtight container for up to 24 hours in the fridge.
That's it — you did it. But hold on, I've got a few more tricks that'll take this to another level...
Insider Tricks for Flawless Results
The Temperature Rule Nobody Follows
Many bakers think higher heat always yields a better caramelized marshmallow, but the truth is a moderate 375°F (190°C) is optimal. A higher temperature can burn the marshmallow before it has a chance to puff, while a lower temperature will leave it gooey and under‑cooked. Keep an eye on the oven’s temperature with a reliable thermometer if your oven runs hot or cold.
Why Your Nose Knows Best
Before you even touch the baking sheet, pause and inhale the aroma. A faint sweet smell indicates the chocolate is melting properly, while a sharp, burnt scent means you’re over‑cooking. Your nose is a reliable sensor for the exact moment the marshmallows turn golden.
The 5‑Minute Rest That Changes Everything
After the final bake, let the s'mores rest for exactly five minutes. This short pause allows the chocolate to set into a firm glaze while the marshmallow softens just enough for a smooth bite. Skipping this step will leave the chocolate tacky and the marshmallows too soft to hold their shape.
Flip with a Spatula, Not a Fork
A wooden or silicone spatula provides a gentle lift, keeping the marshmallow intact. A fork can puncture the marshmallow, causing it to burst and lose its puffed shape. The spatula also helps spread any excess melted chocolate evenly over the top.
Use a Silicone Baking Mat
Silicone mats keep the s'mores from sticking, even when the chocolate has set. They also allow for even heat distribution, which prevents hot spots that could cause uneven melting. When you’re ready to serve, just lift the mat and the s'mores will glide off effortlessly.
Creative Twists and Variations
This recipe is a playground. Here are some of my favorite ways to switch things up:
Nutty Crunch
Swap the graham crackers for toasted almond biscotti. The nutty flavor and extra crunch elevate the dessert, and the almond pieces add a satisfying bite. This version pairs wonderfully with a splash of almond milk for an extra flavor layer.
Chocolate‑Infused Marshmallow
Before baking, drizzle a thin line of melted dark chocolate over each marshmallow. The chocolate will caramelize, creating a glossy, chocolate‑covered puff that’s irresistible to chocolate lovers. Add a sprinkle of sea salt for contrast.
Fruit‑Topped S’mores
Place a thin slice of fresh strawberry or a few blueberries on top of each marshmallow before the second bake. The fruit will steam, adding a burst of juiciness that complements the chocolatey base. This variation works especially well in summer.
Spiced Edition
Stir a pinch of ground cinnamon or nutmeg into the melted chocolate before pouring it over the crackers. The warm spices add depth and a comforting aroma reminiscent of autumn. Serve with a cup of hot cocoa for a cozy treat.
Mini S’mores
Use mini marshmallows and half‑size graham cracker squares to create bite‑size s'mores perfect for parties or dessert bars. The smaller size allows for more servings and a playful presentation. Just keep an eye on baking time; mini versions cook slightly faster.
Vegan Version
Replace the Hershey’s Milk Chocolate Bar with a dairy‑free chocolate bar, and use vegan marshmallows made from agar or carrageenan. The texture remains creamy, and the flavor profile stays true to the original. The vegan version is a hit among plant‑based friends.
Storing and Bringing It Back to Life
Fridge Storage
Place the cooled s'mores in an airtight container and store them in the refrigerator for up to 24 hours. The chocolate will firm up, and the marshmallows will soften slightly, but the overall texture remains delightful. When you’re ready to serve, let them sit at room temperature for 10 minutes to soften the chocolate a touch.
Freezer Friendly
For longer storage, wrap each s'more individually in parchment paper and place them in a freezer bag. They can be frozen for up to 2 weeks. When you want to enjoy them, thaw at room temperature for 15–20 minutes. The chocolate may become slightly hard, but a quick bake at 350°F (175°C) for 3–4 minutes will restore the melt.
Best Reheating Method
To bring a refrigerated or frozen s'more back to its molten glory, preheat the oven to 350°F (175°C). Place the s'mores on a parchment‑lined tray and bake for 3–4 minutes, or until the chocolate is glossy and the marshmallow is slightly puffed. Add a tiny splash of water to the tray before baking; the steam will help the marshmallow soften without drying out the chocolate.