It was 11:47 p.m. on a Tuesday when I found myself standing in front of the fridge, fork in hand, contemplating whether eating cold leftover baked potatoes straight from the Tupperware counted as a legitimate life choice. The potato was dry, the toppings were non-existent, and yet I was about to commit this culinary crime. That's when it hit me — what if I could create a baked potato so outrageously delicious, so loaded with flavor, that even the most dignified food snob would willingly eat it at midnight? Thus began my three-week obsession with perfecting the ultimate chicken bacon ranch baked potato, and folks, I'm practically buzzing with excitement to share the results.
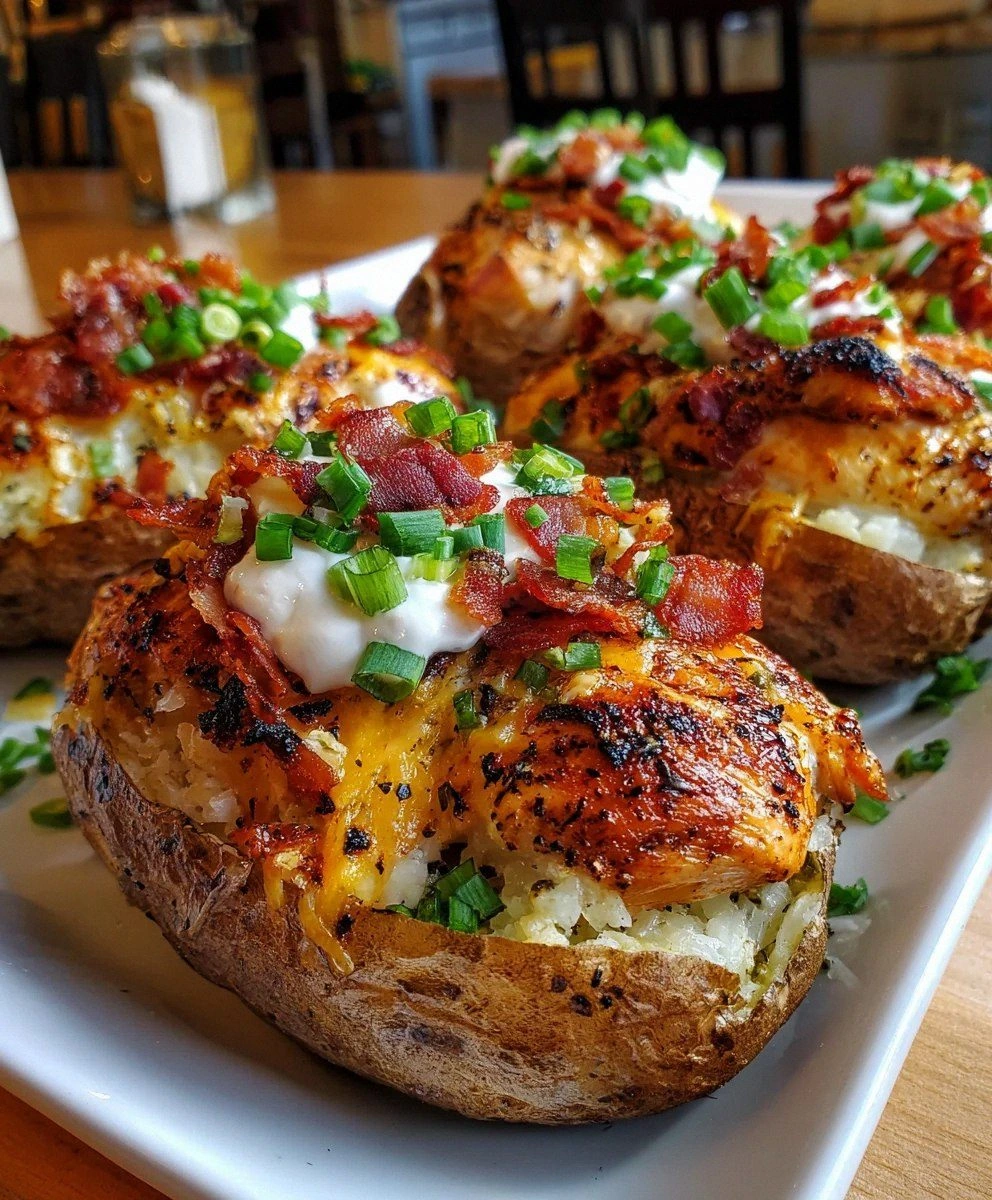
Picture this: a russet potato so perfectly baked that its skin crackles like autumn leaves under gentle pressure, revealing a fluffy interior that's been secretly brushed with garlic-infused olive oil. Now imagine that potato cradling tender, juicy chicken thighs that have been kissed by the grill and tossed in a homemade ranch seasoning blend that'll make your taste buds do a happy dance. Top that with crispy bacon bits that shatter like thin ice between your teeth, molten cheddar cheese that stretches into Instagram-worthy cheese pulls, and a cool dollop of sour cream that cuts through all that richness like a refreshing mountain breeze.
But here's where it gets interesting — most recipes get this completely wrong. They pile everything on top of a sad, steamed potato and call it a day. No, no, no. What we're doing here is building layers of flavor that would make an architect jealous. We're talking about a potato that's been rubbed down with olive oil and garlic salt, baked until the skin achieves that perfect crispy texture that makes a satisfying crack when you cut into it. The chicken isn't just any chicken — it's grilled to perfection with a homemade ranch seasoning that makes the store-bought stuff taste like cardboard.
Let me walk you through every single step — by the end, you'll wonder how you ever made it any other way.
What Makes This Version Stand Out
The Potato Whisperer Method: While everyone else is wrapping their potatoes in foil like it's 1985, we're going commando style — direct oven rack contact for maximum crispiness. The result? Skin so crispy you'll find yourself snacking on it like potato chips, while the inside stays fluffy enough to make clouds jealous.
Ranch Seasoning Revelation: Most people dump a packet of store-bought ranch mix and consider the job done. We're making our own blend with buttermilk powder, dried herbs, and just the right amount of garlic that makes the chicken taste like it's been marinating for hours (spoiler: it only needs 30 minutes).
Bacon Strategy: Instead of tossing raw bacon into the chaos, we cook it low and slow until it reaches peak crispiness, then crumble it into pieces that stay crispy even when buried under cheese. The bacon fat? We save that liquid gold for brushing the potato skins.
Cheese Architecture: We're not just sprinkling cheese on top and hoping for the best. We're creating a cheese blanket that melts into every nook and cranny, then adding a second layer right before serving for that perfect cheese pull moment.
Make-Ahead Magic: This recipe is basically meal prep's best friend. You can bake the potatoes ahead, grill the chicken in batches, and even prep the ranch seasoning. Assembly takes five minutes, making this perfect for those "I want comfort food but I don't want to cook" days.
Leftover Transformation: Here's the game-changer — turn leftovers into loaded potato skins, mash them into potato pancakes, or stuff them into quesadillas. I've honestly never had leftovers last more than 24 hours, but if you're stronger than me, the possibilities are endless.
Texture Symphony: Every bite hits you with crispy potato skin, tender chicken, crunchy bacon, creamy sour cream, and sharp cheese. It's like a rock band in your mouth, but everyone's playing in perfect harmony.
Customization Paradise: Vegetarian? Swap the chicken for grilled portobello and the bacon for smoked tempeh. Watching your calories? Greek yogurt instead of sour cream, turkey bacon instead of regular, and go easy on the cheese. The base recipe is just the beginning of your flavor adventure.
Alright, let's break down exactly what goes into this masterpiece...
Inside the Ingredient List
The Flavor Base
Baking potatoes are the foundation of this entire operation, and choosing the right ones is like picking the perfect dance partner — you want someone who can hold their shape while still being flexible enough to move with the music. Russet potatoes are the Beyoncé of the potato world here, with their thick skin that crisps up beautifully and starchy interior that fluffs up like a dream. Don't even think about using waxy potatoes like red or Yukon Gold; they'll just give you a gummy texture that'll make you want to cry into your sour cream. Look for potatoes that feel heavy for their size and have smooth, unblemished skin — those are the ones that'll give you the best texture contrast between crispy exterior and fluffy interior.
The Protein Powerhouse
Chicken thighs are where it's at, and I'll fight anyone who says otherwise. Sure, chicken breast is leaner, but thighs are like the dark horse of the poultry world — they're more forgiving, stay juicy even if you accidentally overcook them, and they have this rich, chicken-y flavor that breast meat can only dream about. When grilled with our homemade ranch seasoning, they develop this gorgeous caramelized exterior that adds incredible depth to the whole dish. If you're absolutely married to chicken breast, I won't judge you to your face, but you'll need to watch it like a hawk to prevent it from drying out. Pro tip: pound the chicken to an even thickness before seasoning — this ensures every bite is perfectly cooked and no one gets a mouthful of dry disappointment.
The Crunch Factor
Bacon isn't just a topping here — it's a textural element that brings the whole dish together like the final piece of a jigsaw puzzle. We're not talking about limp, sad bacon that you could floss with. No, we want bacon that's been cooked until it reaches that perfect state of crispy where it shatters between your teeth but still has a hint of chew. The key is starting with a cold pan and cooking it low and slow, letting the fat render out gradually. This gives you bacon that's crispy throughout, not just on the edges. And here's the kicker — save that bacon fat. Brush a little on your potato skins before the final bake, and you'll achieve a level of flavor that'll make you question why you ever ate plain baked potatoes.
The Cheese Situation
Cheddar cheese is our go-to, but not just any cheddar will do. We're talking about sharp cheddar that actually tastes like something — none of that rubbery, flavorless stuff that comes pre-shredded in bags. Buy a block and shred it yourself; I know it's extra work, but pre-shredded cheese is coated with cellulose that prevents it from melting properly. You want cheese that melts into a smooth, creamy blanket, not a greasy, separated mess. If you're feeling fancy, mix in some pepper jack for a subtle kick or smoked gouda for extra depth. The cheese goes on in two stages — first to melt into all the crevices, then a final sprinkle right before serving for that perfect cheese pull moment that'll make your Instagram followers weep with envy.
The Fresh Finish
Green onions are the unsung heroes here, providing that fresh, sharp bite that cuts through all the richness like a cool breeze on a hot day. Don't even think about skipping them — they're not just garnish, they're an integral part of the flavor balance. Slice them thin on the bias for maximum surface area and sprinkle them on right before serving so they stay crisp and vibrant. If green onions aren't your thing (though I can't imagine why they wouldn't be), chives work beautifully too, or even thinly sliced red onion for a more pronounced bite. The key is having something fresh and bright to contrast all that creamy, cheesy, bacon-y goodness.
Everything's prepped? Good. Let's get into the real action...
The Method — Step by Step
- Prep Your Potatoes Like a Pro: Start by scrubbing your russet potatoes under cold running water, using a vegetable brush to remove any dirt or eyes. Dry them thoroughly with a clean kitchen towel — moisture is the enemy of crispy skin. Using a sharp fork, stab each potato 6-8 times all over. This isn't just to prevent explosions (though that's important), it also creates steam vents that help the interior cook evenly. Rub each potato with olive oil until it's completely coated, then sprinkle generously with garlic salt. Don't be shy here — most of the seasoning ends up on the skin, which becomes the crispy, flavorful wrapper for all your toppings.
- The Baking Game-Changer: Preheat your oven to 425°F and position a rack in the middle. Here's where most people go wrong — they wrap their potatoes in foil, essentially steaming them. We want crispy skin, so place your potatoes directly on the oven rack. Put a sheet pan on the lower rack to catch any drips. Bake for 50-60 minutes, depending on size. You'll know they're done when a fork slides in with no resistance and the skin feels crispy to the touch. If you've got really large potatoes, they might need up to 75 minutes. Don't rush this step — undercooked potatoes are a crime against humanity.
- Chicken Seasoning Magic: While your potatoes are baking, it's time to transform ordinary chicken into something extraordinary. In a small bowl, combine your ranch seasoning mix with a tablespoon of olive oil to create a paste. This helps the seasoning stick to the chicken and creates a gorgeous crust when grilled. Pat your chicken thighs dry with paper towels — moisture is the enemy of good browning. Rub the seasoning paste all over the chicken, making sure to get it into all the nooks and crannies. Let it sit for at least 30 minutes at room temperature. This isn't just about flavor (though that's huge), it also helps the chicken cook more evenly.
- Grill to Perfection: Heat your grill or grill pan over medium-high heat. You want it hot enough to create those gorgeous grill marks but not so hot that the outside burns before the inside cooks. Place the chicken on the grill and don't move it for 6-7 minutes. I know it's tempting to check, but leave it alone — this is how you get those Instagram-worthy grill marks. Flip and cook for another 5-6 minutes until the internal temperature reaches 165°F. Transfer to a plate and let it rest for 5 minutes. This rest period is crucial — it allows the juices to redistribute, ensuring every bite is moist and flavorful.
- Bacon Brilliance: While the chicken rests, start your bacon in a cold skillet. Lay the strips out without overlapping, then turn the heat to medium-low. This slow rendering is the secret to perfectly crispy bacon. Turn the strips occasionally, letting them cook for about 15-20 minutes total. You're looking for a deep golden brown color and most of the fat rendered out. Transfer to a paper towel-lined plate to drain and cool. Once cool, crumble into bite-sized pieces. Don't make them too small — you want to taste the bacon in every bite. Save that bacon fat in a jar — it's liquid gold for cooking everything from eggs to vegetables.
- The Assembly Strategy: Now comes the fun part — putting it all together. Slice each potato lengthwise, cutting about three-quarters of the way through. Use a clean kitchen towel to hold the potato (it's hot!), and gently squeeze the ends together to fluff up the interior. Add a pat of butter if you're feeling indulgent, then season the inside with salt and pepper. Pile on the sliced chicken, making sure to distribute it evenly. Sprinkle with half the cheese, letting it melt into all the crevices. Add the bacon pieces, then top with the remaining cheese. Return to the oven for 3-4 minutes just to melt the cheese completely.
- The Final Flourish: Remove from the oven and immediately top with a generous dollop of sour cream. Don't just plop it in the middle — dollop it artistically so every bite gets some creamy goodness. Sprinkle with the green onions, making sure to get some on the plate for visual appeal. If you're feeling extra fancy, add a crack of fresh black pepper or a light dusting of smoked paprika. Serve immediately while everything is hot and melty. Trust me, the aroma wafting from these potatoes will have everyone hovering around the kitchen like vultures.
- Serving Like a Pro: These potatoes are a meal on their own, but if you want to gild the lily, serve them with a simple green salad dressed with lemon vinaigrette. The acid cuts through all the richness beautifully. Set out extra sour cream and green onions on the table for those who want to customize their experience. And here's a pro tip — cut a small slit in the bottom of each potato before serving. This prevents steam from building up and making the bottom soggy as they sit. It's a small detail, but it's what separates the amateurs from the professionals.
That's it — you did it. But hold on, I've got a few more tricks that'll take this to another level...
Insider Tricks for Flawless Results
The Temperature Rule Nobody Follows
Here's the thing about baking potatoes — most recipes tell you to bake at 350°F, which is like asking Usain Bolt to run a marathon. It's just wrong. Potatoes need high heat to develop that crispy skin, which is why we crank it up to 425°F. But here's the kicker — if your potatoes are particularly large, drop the temperature to 400°F after the first 30 minutes. This prevents the outside from burning before the inside cooks through. It's like the potato equivalent of searing a steak and then finishing it at a lower temperature. The result is a potato that's crispy outside, fluffy inside, and cooked perfectly throughout. A friend tried skipping this step once — let's just say it didn't end well, and we still tease him about his "charcoal surprise" potatoes.
Why Your Nose Knows Best
Forget timers — your nose is the most reliable kitchen tool you have. When your potatoes are getting close to done, your kitchen will start smelling like the world's best bakery. That's the starches breaking down and creating those nutty, slightly sweet aromas that signal potato perfection. If you smell something burning, though, check immediately — it probably means one of your potatoes is touching the oven element or your sheet pan needs emptying. This sensory approach works for every element of this dish. When your chicken is properly grilled, it'll smell like summer barbecues and fresh herbs. When your bacon is perfectly crispy, it'll fill the house with that unmistakable smoky-sweet aroma that makes neighbors knock on your door asking what you're cooking.
The 5-Minute Rest That Changes Everything
After your potatoes come out of the oven, let them rest for exactly 5 minutes. Not 3, not 10 — 5. This brief pause allows the steam inside to redistribute, making the interior even fluffier. It's also the perfect amount of time for the skin to set, so when you cut into it, you get that satisfying crack instead of the skin peeling away like sad wallpaper. During this rest, tent them loosely with foil — not wrapped tightly, just a gentle cover. This keeps them warm while preventing the skin from getting soggy. Use this time to finish your chicken or set up your assembly station. Multitasking at its finest, and your patience will be rewarded with potatoes that are texturally perfect.
The Cheese Melting Secret
Want cheese that melts into a smooth, creamy blanket instead of a greasy, separated mess? The secret is temperature and timing. Your potatoes need to be hot enough to melt the cheese, but not so hot that they burn it. Add your first layer of cheese when the potato is fresh from the oven, then return it to the oven just until the cheese melts — usually 2-3 minutes. For the final cheese layer, add it right before serving and hit it with a kitchen torch or place it under the broiler for 30 seconds. This gives you that perfect cheese pull without overcooking the potato. And please, for the love of all things dairy, shred your own cheese. Pre-shredded cheese contains cellulose that prevents proper melting, leaving you with a sad, clumpy mess.
The Flavor Balance Formula
These potatoes are rich — we're talking "need a nap after eating" rich. The key to making them addictive rather than overwhelming is balance. The sour cream isn't just there for creaminess; its tang cuts through all the fat like a knife through butter. The green onions provide a fresh, sharp contrast to all the rich ingredients. Even the ranch seasoning on the chicken works double duty, adding herbs and buttermilk notes that brighten everything up. If you taste your assembled potato and find it too heavy, add a squeeze of lemon juice or a few drops of hot sauce. It's like adding a high note to a chord — suddenly everything comes into perfect harmony.
Creative Twists and Variations
This recipe is a playground. Here are some of my favorite ways to switch things up:
The Buffalo Chicken Remix
Swap the ranch seasoning for buffalo wing sauce mixed with a touch of ranch. The tangy, spicy chicken pairs beautifully with the cooling sour cream. Add some crumbled blue cheese on top with the cheddar for that authentic wing experience. Celery leaves make a great substitute for green onions here, giving you that classic buffalo wing accompaniment. I dare you to taste this and not go back for seconds — especially if you're a buffalo wing fanatic like my cousin who once ordered them for Thanksgiving dinner.
The Breakfast-for-Dinner Edition
Transform this into a breakfast feast by adding a perfectly fried egg on top. The runny yolk creates a sauce that ties everything together in ways that'll make you question why you don't eat breakfast foods at every meal. Swap the chicken for breakfast sausage, add some hash browns underneath, and you've got a loaded potato that works for dinner, breakfast, or that magical time in between. I'll be honest — I ate half the batch before anyone else got to try it when I first made this version.
The Vegetarian Powerhouse
Skip the chicken and bacon, and load up on grilled portobello mushrooms, roasted red peppers, and crispy chickpeas seasoned with smoked paprika. The mushrooms provide that meaty texture, while the chickpeas give you the crunch you lose from the bacon. Add some smoked gouda to bring back that smoky element. Even dedicated carnivores won't miss the meat — my steak-loving neighbor devoured these and asked for the recipe.
The Tex-Mex Transformation
Season your chicken with taco spices instead of ranch, swap the cheddar for pepper jack, and add black beans and corn to the mix. Top with pico de gallo instead of sour cream, and add a sprinkle of cotija cheese for authenticity. A drizzle of chipotle crema takes this over the top. This version is like a fiesta in potato form — bright, spicy, and completely irresistible. Picture yourself pulling this out of the oven, the whole kitchen smelling incredible, with mariachi music playing in your head.
The French Onion Soup Mashup
Caramelize onions low and slow until they're jammy and sweet, then pile them on your potato with gruyere cheese instead of cheddar. The chicken gets seasoned with herbs de Provence, and the bacon is replaced with crispy shallots. It's like French onion soup and loaded potatoes had a beautiful baby. This one's perfect for when you want something that feels fancy but is secretly comfort food in disguise.
The Hawaiian Luau Edition
Add some tropical flair with teriyaki-marinated chicken, crispy spam (don't knock it till you try it), and a pineapple salsa on top. The sweet and savory combination is absolutely addictive. Use Monterey jack cheese and add some macadamia nuts for crunch. Serve with a side of coconut rice if you really want to commit to the theme. Stay with me here — this is worth it, even if it sounds crazy.
The Skinny Jean Friendly Version
For those days when you want the flavor without the food coma, use Greek yogurt instead of sour cream, turkey bacon or even turkey breast instead of regular bacon, and go lighter on the cheese. Load up on extra green onions and add some steamed broccoli for bulk. The trick is using stronger flavored cheeses like extra-sharp cheddar or aged gouda, so a little goes a long way. You get all the satisfaction with half the calories, proving that you can have your potato and eat it too.
Storing and Bringing It Back to Life
Fridge Storage
Leftovers (if you have any) will keep in the refrigerator for up to 4 days, but let's be real — they've never lasted more than 2 days in my house. Store the components separately for best results: potatoes in one container, chicken in another, and toppings in small containers or bags. This prevents the potato from getting soggy and the bacon from losing its crispness. Wrap each potato individually in foil or plastic wrap, making sure they're completely cooled first to prevent condensation. The chicken should be stored in an airtight container with any juices poured over it to keep it moist. Pro tip: write the date on a piece of tape and stick it on the container — future you will thank present you for this small act of kindness.
Freezer Friendly
These potatoes freeze surprisingly well, though I recommend freezing the components separately for best texture. Fully baked potatoes can be frozen for up to 3 months — wrap them individually in plastic wrap, then foil, and label with the date. Chicken freezes beautifully for up to 4 months; slice it before freezing so it thaws quickly. Cheese can be frozen, but it might get a bit crumbly when thawed, so use it in cooked applications rather than for fresh sprinkling. The only thing that doesn't freeze well is the sour cream — it separates and gets weirdly grainy. Freeze everything else and add fresh sour cream when reheating. To thaw, move to the refrigerator overnight for best results, though the microwave's defrost setting works in a pinch.
Best Reheating Method
The oven is your friend here — 350°F for 15-20 minutes wrapped in foil with a tiny splash of water to create steam. This brings the potato back to life without drying it out. For the chicken, wrap it in foil with a tablespoon of chicken broth or water and heat at 350°F for 10-12 minutes. The microwave works in emergencies, but cut your potato in half first and cover it with a damp paper towel to prevent it from turning into a potato hockey puck. Add a tiny splash of water before reheating — it steams back to perfection. Whatever you do, don't reheat the bacon in the microwave unless you enjoy the taste of bacon-flavored leather. Reheat it in a dry skillet over medium heat for 2-3 minutes to restore its crispy glory.