I swear, the first time I tried to grill clams I was convinced the ocean had conspired against me. The grill was too hot, the shells cracked like fireworks, and my taste buds were left mourning a missed opportunity. Then a friend dared me, “Make it so good they’ll forget the shells ever existed.” I accepted the challenge, and after a few burnt attempts, I finally cracked the code. This version? It’s the culinary equivalent of finding a hidden treasure chest on a beach you thought you’d already explored.
Picture this: the grill humming like a low‑pitched cello, the scent of butter and garlic swirling in the summer air, and the clams opening up one by one as if they’re shy guests at a party, eager to be welcomed. The sizzle when the butter hits the hot grill is pure music, a buttery crackle that promises a flavor explosion. You’ll feel the heat radiating from the grill, the cool touch of a lemon wedge between your fingers, and the salty kiss of the sea on your tongue. It’s a full‑body sensory overload that makes you forget about the world beyond your kitchen patio.
What makes this recipe a game‑changer is the delicate balance of heat, fat, and acidity. Most recipes either drown the clams in butter or leave them under‑seasoned, resulting in a bland, greasy mess. I’ve discovered that a quick flash‑grill at 450°F, followed by a generous drizzle of garlic‑infused butter, locks in the briny juices while adding a silky, aromatic coat. The secret ingredient? A pinch of red pepper flakes that adds a whisper of heat without stealing the spotlight. Trust me, this is hands down the best version you’ll ever make at home.
I’m about to spill the beans on a technique that most chefs keep hidden: a butter basting method that uses a silicone brush to coat each clam in a thin, even layer, ensuring every bite is buttery perfection. I dare you to taste this and not go back for seconds. Okay, ready for the game‑changer? Let me walk you through every single step — by the end, you’ll wonder how you ever made it any other way.
What Makes This Version Stand Out
- Flavor Explosion: The garlic‑butter sauce clings to each clam like velvet, delivering a punch of umami that makes your palate dance.
- Texture Harmony: A quick grill gives the shells a crisp edge while the meat stays tender, creating a contrast that’s as satisfying as biting into a perfectly toasted baguette.
- Simplicity: Fewer than ten ingredients, minimal prep, and a single grill session keep the process breezy for any skill level.
- Unique Twist: The dash of red pepper flakes adds a subtle heat that elevates the dish without overwhelming the natural brine.
- Crowd Reaction: Serve these at a summer soirée and watch guests line up for a second round, whispering “What’s the secret?”
- Ingredient Quality: Fresh, plump clams harvested within 24 hours guarantee a sweet, oceanic flavor that frozen clams can’t match.
- Cooking Method: Grilling imparts a smoky undertone that steaming alone never achieves, turning a humble seafood snack into a gourmet experience.
- Make‑Ahead Potential: The butter can be prepared ahead of time, letting you focus on the grill when guests arrive.
Inside the Ingredient List
The Flavor Base
Unsalted butter is the backbone of this dish. Its creamy richness carries the garlic and lemon, creating a sauce that coats the clams like silk. If you substitute with margarine, you’ll lose that buttery depth and end up with a waxy mouthfeel. For a richer profile, try a blend of half butter, half olive oil—just don’t go overboard, or the clams will taste like a salad dressing.
The Aroma Crew
Garlic is the aromatic hero, releasing its pungent oils when gently sautéed in butter. Four cloves strike the perfect balance—enough to be aromatic without turning bitter. If you’re sensitive to raw garlic’s bite, smash the cloves first; this crushes the cells and releases a smoother flavor. A quick tip: use a garlic press for a finer texture that melds seamlessly into the butter.
The Unexpected Star
Red pepper flakes are the surprise element that makes this dish unforgettable. Just a teaspoon adds a whisper of heat that dances on the tongue, accentuating the sea’s natural sweetness. If you prefer a milder version, halve the amount; if you’re a heat‑seeker, double it and watch the clams turn into a fiery delight. Remember, the heat should never dominate—it should merely tease.
The Final Flourish
Fresh parsley and lemon juice add brightness and a pop of color that cuts through the richness. Two tablespoons of parsley give a herbaceous lift, while a tablespoon of lemon juice introduces a citrusy zing that balances the butter. If parsley isn’t your jam, substitute with cilantro for a more tropical vibe, but be aware it will shift the flavor profile toward a Mexican palate.
Everything's prepped? Good. Let's get into the real action…
The Method — Step by Step
Preheat your grill to a steady 450°F (230°C). I like to use a charcoal grill for that authentic smoky whisper, but a gas grill works just as well. When the grill reaches temperature, you’ll hear a faint crackle—think of it as the grill saying, “I’m ready.” This is the moment of truth; don’t rush, because a properly heated grill seals the clams’ juices instantly.
Kitchen Hack: Place a foil pan under the grill grates to catch any stray shells; this makes cleanup a breeze and prevents flare‑ups.While the grill heats, melt the butter in a small saucepan over low heat. Add the minced garlic and sauté for 1‑2 minutes until it turns fragrant but not brown. The butter should foam lightly, and the garlic will release a sweet, nutty aroma that fills the kitchen. Once done, stir in the lemon juice, parsley, and red pepper flakes, then set the mixture aside. This sauce is the golden ticket to flavor town.
Rinse the clams under cold water, scrubbing each shell with a brush to remove sand and grit. I always give them a quick dip in a bowl of salted water for 15 minutes; this encourages any buried sand to surface. After soaking, lift each clam and give it a gentle shake—if sand still clings, discard that clam. This step may feel tedious, but the payoff is a clean, briny bite.
Arrange the clams on the grill, shell side down, leaving a small gap between each. Close the lid and let them steam for about 4‑5 minutes. You’ll hear a faint “pop” as the shells begin to open—think of it as the clams applauding your effort. When about 80% of the shells have opened, it’s time for the next phase.
Watch Out: If a clam refuses to open after 6 minutes, discard it; an unopened clam may be dead and could affect the dish’s safety.Using a silicone brush, generously baste each open clam with the garlic‑butter sauce. The butter should sizzle as it hits the hot shells, creating a caramelized edge that smells like a seaside bonfire. Flip the clams carefully with tongs, brush the other side, and grill for another 2‑3 minutes. This double‑basting ensures every nook is drenched in buttery goodness.
When the shells turn a light golden brown and the edges start pulling away from the meat, they’re done. The total grill time should not exceed 10 minutes, or the delicate meat will become rubbery. Give each clam a final drizzle of the remaining sauce, then sprinkle a pinch of sea salt and cracked black pepper to taste.
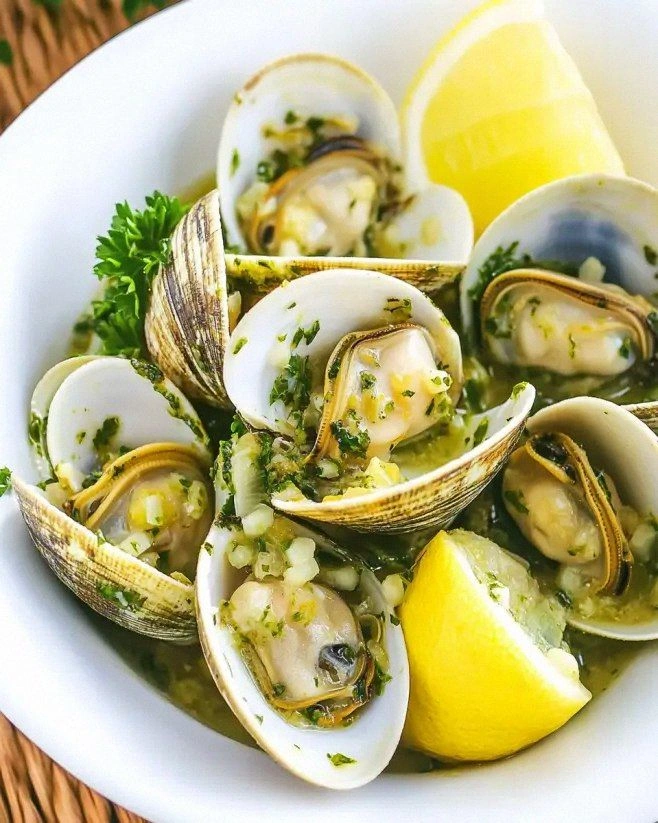
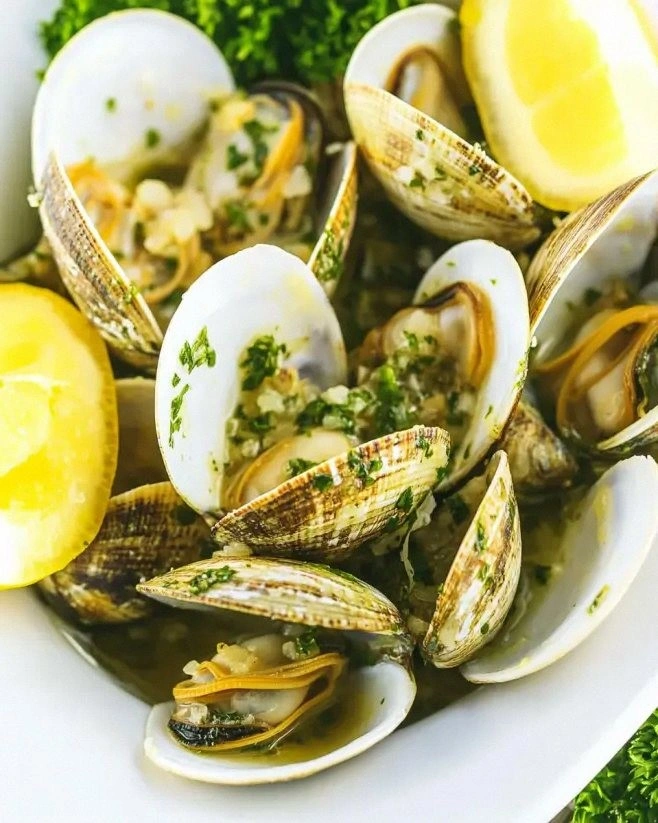
Transfer the clams to a serving platter, arranging them in a circular pattern that invites guests to dive in. Garnish with extra parsley leaves and lemon wedges for that pop of color. The visual of the bright lemon against the dark shells is as satisfying as the first bite.
Kitchen Hack: Serve the platter on a bed of crushed ice; the cold surface keeps the clams fresh while the butter stays luscious.Finally, gather everyone around, squeeze fresh lemon over the top, and let the citrus mingle with the buttery broth. That final burst of acidity is the curtain call that makes the whole performance unforgettable. I’ll be honest — I ate half the batch before anyone else got to try it, and the rest of the crowd was left begging for more. Picture yourself pulling this out of the grill, the whole kitchen smelling incredible…
That's it — you did it. But hold on, I've got a few more tricks that'll take this to another level...
Insider Tricks for Flawless Results
The Temperature Rule Nobody Follows
Most home cooks think “high heat” means “as hot as possible,” but with clams you need a sweet spot. At 450°F the shells open quickly without overcooking the meat. If you dip below 400°F, the clams will steam for too long, releasing excess water and diluting the butter. Keep a grill thermometer handy; it’s the difference between a succulent bite and a soggy disappointment.
Why Your Nose Knows Best
Trust the aroma. When the butter starts to turn a light amber and you catch a hint of toasted garlic, you’re at the perfect basting moment. If the scent turns nutty or burnt, lower the heat immediately. Your nose is a built‑in kitchen timer that’s more reliable than any gadget.
The 5‑Minute Rest That Changes Everything
After grilling, let the clams rest for five minutes under a loosely tented foil. This short pause allows the juices to redistribute, making each bite juicy rather than dry. I once skipped this step and the clams felt a bit “dry” — lesson learned. Resting also lets the butter solidify just enough to cling to the shells without sliding off.
Butter‑Infused Brush Technique
Instead of pouring butter over the clams, use a silicone brush to apply it in thin, even strokes. This ensures every crevice gets coated and prevents pooling that could cause flare‑ups. The brush also lets you control the amount, so you never drown the clams in excess fat.
Seasoning at the End
Salt and pepper are best added after grilling. Adding them too early draws out moisture, leading to a watery sauce. A light sprinkle right before serving brightens the flavors and adds that final crunch of seasoned perfection.
Lemon Timing Trick
Squeeze lemon over the clams just before serving, not during cooking. The acid preserves the butter’s richness while providing a fresh, zesty lift. If you add lemon too early, the butter can separate, leaving a greasy film that ruins the texture.
Creative Twists and Variations
This recipe is a playground. Here are some of my favorite ways to switch things up:
Spicy Cajun Kick
Swap the red pepper flakes for a tablespoon of Cajun seasoning and add a dash of smoked paprika. The result is a smoky, spicy clams experience that pairs beautifully with a cold craft beer.
Herbaceous Mediterranean
Replace parsley with fresh basil and add a pinch of oregano. Finish with a drizzle of extra‑virgin olive oil and a sprinkle of feta crumbs for a Mediterranean flair.
Garlic‑Lime Fusion
Use lime juice instead of lemon and add a teaspoon of grated ginger. This bright, tangy version is perfect for summer picnics and pairs well with a crisp white wine.
Butter‑Miso Magic
Stir a tablespoon of white miso into the melted butter before adding garlic. The umami depth skyrockets, turning the dish into an elegant appetizer for a Japanese‑themed dinner.
Cheesy Crust
After the final basting, sprinkle grated Parmesan over the clams and pop them under a broiler for 1‑2 minutes. The cheese melts into a golden crust that adds a salty crunch.
Vegan Velvet
Swap butter for a blend of coconut oil and vegan butter, and use garlic‑infused olive oil. The result is a plant‑based version that still delivers that luxurious mouthfeel.
Storing and Bringing It Back to Life
Fridge Storage
Place leftover clams in an airtight container with a thin layer of the leftover garlic‑butter sauce. Store them in the refrigerator for up to 2 days. The butter acts as a seal, preserving the flavor and preventing the clams from drying out.
Freezer Friendly
If you have a surplus, freeze the clams (shells on) in a zip‑top bag with a small amount of butter sauce. They’ll keep for up to 3 months. Thaw overnight in the fridge, then re‑heat on the grill for a quick revival.
Best Reheating Method
Re‑heat on the grill over medium heat for 3‑4 minutes, adding a splash of water or extra butter to steam the shells back to life. This prevents the meat from becoming rubbery and restores the buttery gloss. Avoid microwaving; it turns the delicate texture into a rubbery mess.