I still remember the Halloween party where I brought store-bought jello shots in those flimsy plastic cups with lids that cracked when you tried to open them. The jello was rubbery, the flavors were artificial, and half of them melted into a sad puddle before midnight. I stood there watching my friends politely sip these neon disasters, and I swore I'd never serve mediocre jello shots again. Fast forward to last October when I decided to create the ultimate Halloween jello shots that would actually taste incredible while looking absolutely terrifying. After three weeks of testing, tasting, and yes, consuming way more jello than any adult should, I finally cracked the code. These aren't your college party jello shots that taste like cough syrup mixed with regret. These are sophisticated, multi-layered creations with real fruit flavors and perfect textures that make grown adults giggle like kids.
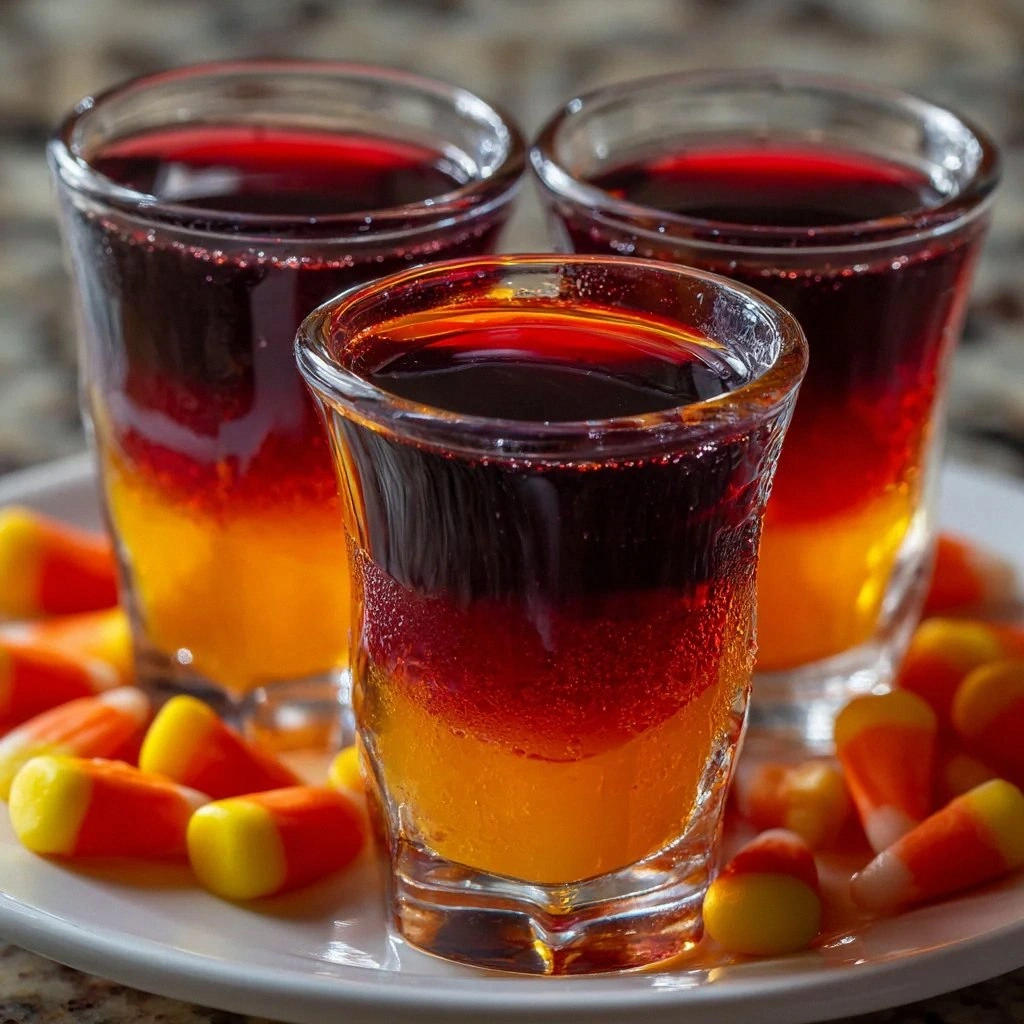
Picture this: you're hosting a Halloween party, the lights are dimmed, spooky music plays in the background, and you present a tray of these beauties. The orange layer glows like molten ember, while the purple layer swirls mysteriously below. When your guests take their first bite, their eyes widen not from the alcohol content, but from the explosion of actual fruit flavor. The orange layer tastes like fresh citrus with a whisper of vanilla, while the dark layer carries deep notes of black cherry that taste like autumn in a glass. The texture is perfectly set — firm enough to hold its shape when you pop it out, but soft enough to melt on your tongue like a whisper. That jiggle when you set them down on the table? Absolute perfection.
What makes these Halloween jello shots absolutely legendary is the technique that nobody else seems to know about. Most recipes tell you to just mix boiling water with jello powder and call it a day. But here's the secret that changes everything: we're going to bloom the gelatin properly, layer the flavors with temperature precision, and add a touch of cream to create that restaurant-quality texture that makes people ask for your secret. The layering technique creates these gorgeous ombre effects that look like magic potions, while the garnishes — candy corn that melts slightly on top, gummy worms that peek out like they're crawling from the grave — add that theatrical touch that makes Halloween parties memorable.
Let me walk you through every single step — by the end, you'll wonder how you ever made it any other way. These shots will become your signature party trick, the recipe your friends beg for, and the reason people start inviting you to every gathering just so you'll bring "those amazing jello things." Trust me, once you master this technique, you'll never serve boring jello shots again.
What Makes This Version Stand Out
Flavor Explosion: Unlike those artificial-tasting shots from your past, these use real fruit juice concentrates and quality vodka to create layers of authentic flavor that taste like candy but pack an adult punch. The orange layer bursts with citrus brightness while the dark layer delivers deep, mysterious fruit notes that complement each other perfectly.
Texture Perfection: Most jello shots are either rubbery bricks that bounce off the table or so soft they melt into puddles. This recipe hits that sweet spot where they're firm enough to hold intricate shapes but dissolve the moment they hit your tongue like autumn mist. The secret? Precise gelatin ratios and temperature control that creates a texture so smooth it should come with a warning label.
Visual Drama: These aren't just jello shots — they're edible art. The two-tone layers create a mesmerizing effect that looks like captured sunset, while the garnishes turn each shot into a miniature Halloween scene. When the light hits them just right, they glow like liquid amber and amethyst, making your dessert table look like something from a fancy cocktail bar.
Make-Ahead Magic: Here's the beautiful part — these actually get better if you make them up to three days ahead. The flavors meld and intensify while the texture sets to perfect consistency. No more last-minute kitchen chaos on party day. Just pull them out of the fridge and watch your guests' jaws drop when they see your "effortless" presentation.
Crowd-Pleasing Flexibility: Whether your friends prefer their drinks sweet or strong, you can adjust the alcohol content without affecting the set. Want them kid-friendly? Skip the vodka entirely and you've got gorgeous fruit jellies. Want them extra boozy? We'll show you exactly how much alcohol these can handle before they refuse to set.
Instagram-Worthy Without the Hassle: Despite looking like they came from a professional kitchen, these require zero special equipment beyond basic measuring tools and some plastic shot cups. No candy thermometers, no specialty molds, no techniques that require culinary school. If you can boil water and stir, you can create these show-stopping treats that'll break your social media.
Endless Variation Potential: Once you master the base technique, you can create infinite flavor combinations. Swap the orange for lime and add tequila for margarita shots, or use cherry and rum for a tropical twist. The layering method works with any complementary flavors, turning you into the jello shot artist your friends never knew they needed.
Alright, let's break down exactly what goes into this masterpiece...
Inside the Ingredient List
The Foundation Builders
The boiling water isn't just there to dissolve powder — it's the key to unlocking the gelatin's full potential. Use water that's just come off a rolling boil, around 200°F, which creates the perfect environment for the gelatin to bloom without becoming grainy. Cold water might seem counterintuitive when you're making something hot, but it's crucial for stopping the cooking process and preventing the alcohol from evaporating. This temperature dance is what separates amateur shots from professional-quality ones that hold their shape while remaining silky smooth.
Your orange jello choice matters more than you'd think. Go for a high-quality brand that lists real fruit juice as one of the first ingredients — the difference in flavor is like comparing fresh-squeezed orange juice to the stuff from concentrate. The vibrant orange color needs to be bold enough to create that striking contrast with the dark layer, but not so artificial that it tastes like candy chemicals. If you can find one with natural coloring from paprika or turmeric, you've struck gold for both flavor and Instagram appeal.
The Alcohol Alchemists
Vodka might seem boring, but it's the perfect blank canvas that lets the fruit flavors shine. Skip the bottom-shelf stuff that tastes like nail polish remover — your shots deserve better. A mid-range vodka that's been filtered multiple times will disappear into the jello, leaving behind only the warming sensation without any harsh burn. If you're feeling adventurous, vanilla vodka adds a sophisticated note that makes the orange layer taste like a creamsicle dream, while citrus vodka amplifies the bright, zesty flavors.
The black cherry or grape jello creates that mysterious dark layer that looks like liquid midnight. Black cherry brings a sophisticated depth with hints of almond and vanilla, while grape goes full nostalgic candy route. Both work beautifully, but black cherry layers more evenly and creates a more dramatic contrast. The key is choosing one with natural fruit flavors rather than the medicinal-tasting artificial versions that remind you of children's cough syrup.
The Garnish Game-Changers
Candy corn isn't just for decoration — when placed on top of the set jello, it absorbs a tiny bit of moisture and develops this gorgeous translucent edge that looks like stained glass. The white tip softens slightly while the orange and yellow sections maintain their shape, creating a tiny edible sculpture. Position them carefully because once they touch the jello, they're committed to that spot for life, like a deliciously sweet tattoo.
Gummy worms need to be the fresh, soft kind, not the fossilized ones that could double as fish bait. Fresh gummy worms will bend and curve naturally, creating realistic "emerging from the grave" effects. Press them partially into the jello before it fully sets so they stand at jaunty angles like they're crawling out of a gelatinous swamp. The sugar coating creates a slight crust that prevents them from getting too soggy while still allowing them to absorb just enough moisture to become even more delicious.
The Quality Control Team
Cold water plays a more important role than just cooling things down. It creates a temperature shock that helps the gelatin set properly without becoming rubbery. Use filtered water if your tap water has strong flavors — chlorine and minerals can affect both the set and the taste. The amount matters too much or too little will throw off the delicate balance that creates that perfect wobble.
Everything's prepped? Good. Let's get into the real action...
The Method — Step by Step
- Start by clearing a flat shelf in your refrigerator — you'll need space for the shots to set undisturbed for several hours. Arrange your plastic shot cups on a baking sheet that fits in your fridge; this makes moving them around infinitely easier and prevents spills. Pour yourself a small glass of wine or sparkling water because we're about to create magic and you deserve to enjoy the process. The anticipation building while you prep is half the fun, like watching a potion come together in a witch's cauldron.
- Dissolve the orange jello powder in boiling water, whisking constantly for a full two minutes. This isn't the time to get impatient — those two minutes ensure every grain dissolves completely, preventing grainy texture that ruins the experience. The mixture should transform from powdery lumps to a smooth, glossy liquid that coats your whisk like liquid sunshine. If you see any undissolved bits, keep whisking because they'll create weird hard spots that feel like finding rocks in your dessert.
- Add cold water and vodka to the orange mixture, stirring gently to combine. The vodka should disappear completely into the mixture, leaving behind only the promise of fun times ahead. This is where you can adjust the strength — want them milder? Use less vodka. Want them to pack more punch? You can go up to half a cup without affecting the set, but any more requires a special technique we'll cover later. The mixture should smell like an orange grove with a mysterious undertone that makes people ask what your secret ingredient is.
- Pour the orange layer into your shot cups, filling each about halfway. This is where having a steady hand pays off, or you can use a small measuring cup with a spout for precision. Tap each cup gently on the counter to release any air bubbles that create weird craters in your perfect surface. Slide the baking sheet into the fridge and set a timer for exactly 45 minutes — this partial set is crucial for creating clean layers that don't blur together like a watercolor left in the rain.
- While the orange layer sets, prepare your black cherry layer using the same technique but with slightly different timing. The dark layer needs to be cooler when you pour it — around room temperature — so it doesn't melt into the partially set orange layer. This temperature difference is what creates those gorgeous, crisp lines between colors. Whisk the black cherry powder with boiling water until it's completely smooth, then let it cool while you practice your patience.
- Check your orange layer after 45 minutes — it should be set enough that you can gently touch the surface without leaving a fingerprint, but still soft enough that the next layer can bond properly. If it's too firm, the layers might separate later like geological strata. If it's too soft, they'll blur together into a muddy mess. The perfect consistency feels like touching a memory foam pillow that's had time to recover.
- Slowly pour the cooled black cherry mixture over the back of a spoon held just above the orange layer. This distributes the liquid gently and prevents it from breaking through your carefully set foundation. Each cup should receive the dark layer like a mysterious fog rolling in over autumn hills. The contrast should be dramatic and crisp, like sunset meeting midnight in a single glass.
- Add your garnishes strategically while the top layer is still slightly soft. Candy corn should be pressed in gently so they stand at attention like tiny orange sentinels. Gummy worms need to be positioned with one end buried and one end emerging, creating the illusion they're crawling from a gelatinous swamp. Work quickly because once the surface skins over, your garnishes won't stick properly and will slide off like failed Olympic divers.
- Refrigerate for a minimum of four hours, but overnight is even better for the ultimate texture. The gelatin continues to develop its structure, creating that perfect balance between firm and melting. The flavors also have time to marry and deepen, transforming from individual notes into a harmonious symphony. When they're ready, they should jiggle like a bowl full of autumn jelly but hold their shape like confident dancers.
- When serving, run a thin knife around the edge of each cup to release the suction that forms between the jello and plastic. This little step ensures your guests can slide the shots out gracefully instead of performing awkward tongue gymnastics trying to reach the bottom. Present them on a tray scattered with fake spider webs or autumn leaves for that extra theatrical touch that makes people reach for their phones before their taste buds.
That's it — you did it. But hold on, I've got a few more tricks that'll take this to another level...
Insider Tricks for Flawless Results
The Temperature Rule Nobody Follows
Most people mess up jello shots by ignoring temperature, but temperature control is the difference between amateur hour and professional results. Your refrigerator should be set between 35-38°F — any colder and the gelatin sets too fast, creating a rubbery texture. Any warmer and you'll be waiting forever for them to set, plus they might develop that weird skin on top. Use a fridge thermometer because the dial settings are usually lying to you, and nobody wants to discover their fridge runs warm after three hours of waiting. The room where you prepare the mixture matters too — if your kitchen is sweltering from cooking other party food, the layers might not set properly and you'll end up with Halloween soup instead of shots.
Why Your Nose Knows Best
Here's a secret that will change your jello shot game forever: smell your mixture before you pour it. The alcohol should enhance the fruit aromas, not overpower them. If all you smell is booze, add a tiny pinch of salt — I'm talking just a few grains — which somehow makes the fruit flavors pop while taming the alcohol edge. This trick works because salt blocks some of the bitterness receptors on your tongue, making everything taste brighter and more vibrant. It's like turning up the color saturation on your taste buds. A friend tried skipping this step once — let's just say her shots tasted like fruit-flavored hand sanitizer and nobody asked for the recipe.
The 5-Minute Rest That Changes Everything
After you whisk each layer, let the mixture rest for exactly five minutes before pouring. This allows the foam to settle and any air bubbles to rise to the surface where you can skim them off with a spoon. Those tiny bubbles create weird dimples in your perfect surface that catch light wrong and make your shots look homemade instead of professional. During this rest, the gelatin starts hydrating properly, which creates a smoother texture in the final product. Cover the bowl with plastic wrap to prevent a skin from forming on top — nothing ruins the perfect pour like gelatinous chunks breaking off and floating in your beautiful layers.
The Secret to Ultra-Smooth Texture
Want to know why restaurant jello desserts have that impossibly smooth texture? It's all about the bloom. Before you add any boiling water, sprinkle your gelatin powder over cold liquid and let it sit for exactly one minute. You'll see it absorb the liquid and transform into something that looks like applesauce — this is called blooming and it's crucial for preventing lumps. Then when you add your boiling water, whisk in a figure-eight pattern rather than circles. This motion incorporates the gelatin more evenly and prevents those annoying little gelatin balls that feel like fish eggs in your shots. The difference is dramatic — bloomed gelatin creates a texture so smooth it should come with a silk rating.
Creative Twists and Variations
This recipe is a playground. Here are some of my favorite ways to switch things up:
The Margarita Makeover
Swap the orange jello for lime and replace the vodka with tequila for shots that taste like authentic margaritas. Add a tiny pinch of salt to the mixture and rim the plastic cups with colored sugar for that authentic cocktail experience. The green layer looks like toxic waste from a mad scientist's lab, perfect for Halloween. Garnish with tiny lime wedges or candy lime slices for a presentation that makes people do a double-take.
The Vampire's Kiss
Use cherry jello for both layers but add a tablespoon of grenadine to the second layer for extra depth and sweetness. The result is a deep blood-red shot that looks incredibly dramatic under party lighting. Add edible glitter to make them sparkle like vampire skin in Twilight, or use black sanding sugar around the rim for a gothic touch. These are dangerously delicious and always the first to disappear at parties.
The Pumpkin Spice Paradise
For fall purists, use orange jello with a teaspoon of pumpkin pie spice mixed in. The spice blend transforms the flavor into autumn in a cup without being overwhelming. Top with whipped cream and a sprinkle of cinnamon just before serving, or add a tiny candy pumpkin on top. These taste like pumpkin pie's cooler, more fun cousin who always brings the party to life.
The Zombie Brain Hemorrhage
Create three layers using orange, lime, and grape jellos for a tri-color effect that looks like something from a horror movie. The key is making each layer extremely thin so they set quickly and create dramatic stripes. Add a few drops of food coloring to intensify the colors — you want them almost neon bright. These look incredibly creepy but taste like a fruit salad that happens to pack a punch.
The Caramel Apple Dream
Use green apple jello for one layer and butterscotch pudding mix (yes, pudding!) for the other. The pudding layer creates a creamy, caramel-like texture that contrasts beautifully with the clear apple layer. These taste exactly like caramel apples from the county fair but with an adult twist that makes them perfect for grown-up Halloween parties. Garnish with tiny candy apple slices or a drizzle of caramel sauce.
The Black Magic Layer
For maximum drama, use black cherry jello with activated charcoal to create a truly black layer that looks like liquid shadow. The charcoal is flavorless but creates an incredibly striking visual against the orange layer. These are perfect for sophisticated Halloween parties where you want something that looks elegant but still fits the theme. Top with edible gold leaf for a luxurious touch that makes them look like they belong in a fancy cocktail bar.
Storing and Bringing It Back to Life
Fridge Storage
These jello shots will keep beautifully in the refrigerator for up to five days, making them perfect for party prep. Store them in a single layer on a baking sheet covered with plastic wrap — don't stack them or they'll stick together and create weird suction marks on the surfaces. The plastic wrap should barely touch the tops of your garnishes to prevent them from drying out and becoming sad little shadows of their former selves. If you notice any condensation forming on the inside of your plastic wrap, replace it with fresh wrap because that moisture can make your garnishes weep and look unappetizing.
Freezer Friendly
Here's a party trick that will change your life: you can freeze these shots for up to two months. The alcohol prevents them from freezing solid, so they maintain that perfect jello texture when thawed. Freeze them uncovered for the first hour, then wrap tightly in plastic wrap once the surface is firm. This prevents ice crystals from forming on top that create weird textures when thawed. To serve, move them to the refrigerator 24 hours before party time and let them thaw slowly. They'll taste exactly like fresh-made shots, which means you can prep for epic parties weeks in advance.
Best Reheating Method
While you shouldn't reheat jello shots (they're a cold dessert), sometimes they get too firm if your fridge runs cold. The solution is simple: let them sit at room temperature for 10-15 minutes before serving. This takes the harsh edge off the cold and allows the flavors to bloom properly. If they're still too firm, place the tray on the counter for 5 minutes, but don't leave them longer or they'll start to sweat and the garnishes will slide off like glaciers calving into the sea. The perfect serving temperature is cool but not ice-cold, when the jello yields gently to a spoon but still holds its shape like a confident dancer.