I still remember the night I ruined three different batches of fish cakes before stumbling into this glorious revelation. There I was, standing in my tiny apartment kitchen at midnight, desperately trying to impress my new roommate who claimed nothing could beat her grandmother's traditional recipe. The first batch fell apart like wet tissue paper, the second turned into a fishy disaster that set off every smoke alarm in the building, and by the third attempt, I was ready to surrender to a frozen pizza. But something magical happened when I reached for that can of tuna in desperation and started riffing with Asian flavors I'd been playing with all week. The aroma of sesame oil hitting the hot pan made my roommate appear like a cartoon character following a scent trail, and when those crispy-edged tuna cakes emerged golden and perfect, she didn't just eat one — she devoured five straight off the cooling rack without even waiting for the spicy mayo.
This isn't just another tuna cake recipe, folks. This is the result of countless trials, midnight snack attacks, and that beautiful moment when desperation meets inspiration. What makes these Asian tuna cakes different? They have that incredible umami bomb quality that makes your taste buds do a happy dance, with edges that shatter like the most delicate tempura while the inside stays moist and tender. The combination of soy sauce, garlic, and those green onions creates layers of flavor that most tuna cakes can only dream of achieving. And that spicy mayo? It's not just an afterthought — it's the silky, creamy, slightly dangerous companion that takes everything from good to absolutely unforgettable.
I've made these for everything from fancy dinner parties where guests assumed I'd slaved for hours, to desperate weeknight dinners when the fridge was practically empty. They're the kind of recipe that makes you look like a culinary genius while secretly being embarrassingly simple. The magic lies in the technique, the quality of ingredients, and a few key steps that most recipes completely skip. Trust me, once you taste these with their crispy panko crust and that addictive spicy mayo, you'll never look at canned tuna the same way again. Let me walk you through every single step — by the end, you'll wonder how you ever made it any other way.
What Makes This Version Stand Out
Umami Explosion: Unlike bland, fishy tuna cakes that taste like cafeteria food, these pack a serious umami punch with soy sauce, garlic, and the natural richness of well-drained tuna. The combination creates a depth of flavor that makes people close their eyes and sigh when they take the first bite. It's that perfect balance of savory, salty, and just a hint of ocean brininess that keeps you coming back for more.
Texture Perfection: Most tuna cakes suffer from either being mushy inside or dry and hockey-puck-like. These achieve the impossible — a shatteringly crisp exterior that gives way to a tender, moist interior that holds together beautifully. The secret? The right ratio of binder to tuna, and that crucial rest period that lets the flavors meld and the texture set up properly.
Weeknight Hero: I dare you to find another impressive dish that comes together in under 30 minutes with pantry staples you probably already have. While other recipes demand fresh fish, special equipment, or hours of prep, these work with basic canned tuna and transform into something restaurant-worthy with minimal effort. Perfect for those nights when you want to feel like a kitchen rockstar without the stress.
Gluten-Free Friendly: Using arrowroot powder instead of traditional flour means these are naturally gluten-free without sacrificing any of that binding power. Plus, the texture actually improves — arrowroot creates a cleaner, less gummy coating that crisps up beautifully. Your gluten-free friends will think you're a wizard, and everyone else will just think they're delicious.
The Sauce That Steals the Show: That spicy mayo isn't just a condiment — it's the creamy, tangy, slightly dangerous element that transforms every bite. Made with just three ingredients, it somehow creates this perfect harmony of heat, acidity, and richness that makes people lick their plates clean. I've watched grown adults scrape the bowl with their fingers when they thought nobody was looking.
Make-Ahead Magic: These cakes actually get better if you prep them ahead of time, making them perfect for entertaining. The mixture can sit in the fridge for up to 24 hours, developing even more flavor. You can even form the patties and freeze them between layers of parchment, ready to fry up whenever the craving strikes. Future you will thank present you for being so smart.
Alright, let's break down exactly what goes into this masterpiece...
Inside the Ingredient List
The Flavor Base
Flaked white tuna is the star here, and quality absolutely matters. Skip the bargain basement stuff that tastes like cat food — you want solid white albacore packed in water, not oil. The water-packed variety gives you cleaner flavor and better texture control. Drain it obsessively well, pressing out every last drop with the back of a spoon or squeezing gently in cheesecloth. Too much moisture is the enemy of crispy edges and structural integrity. Two standard cans will give you the perfect amount for four generous cakes, but I'll be honest — I always make a double batch because they disappear faster than cookies at a bake sale.
Green onions bring freshness and that subtle allium bite that cuts through the richness of the tuna. Here's the trick most people miss — separate the whites from the greens and add them at different stages. The white parts get sautéed briefly to mellow their sharpness, while the green tops stay raw for that bright, fresh pop. This creates layers of onion flavor that make people wonder what your secret is. Don't even think about substituting regular onions here; green onions have that perfect gentle bite that won't overpower the delicate tuna.
The Texture Crew
Eggs are your binding superhero, but timing matters more than you'd think. One large egg is perfect for two cans of tuna — too much and your cakes turn rubbery, too little and they crumble like my willpower in a bakery. Beat it well before adding to ensure even distribution, and let the mixture rest for a few minutes before forming patties. This gives the proteins time to set up and creates that perfect, cohesive texture that holds together beautifully in the pan.
Arrowroot powder is my secret weapon for gluten-free binding that actually works better than wheat flour. It creates this silky, almost glossy texture that helps the cakes hold their shape without any gumminess. If you can't find it, cornstarch works in a pinch, but arrowroot has this magical property of creating crispier edges. Just a tablespoon is enough to work its magic — more isn't better here, as it can make the texture slightly chalky if you go overboard.
The Unexpected Star
Soy sauce is where the umami magic happens, but restraint is key. Just a teaspoon is enough to add that deep, savory complexity without making the cakes taste like soy sauce. I prefer regular soy sauce over low-sodium here because the small amount won't make the dish salty, and the full-flavored version adds more umami. Tamari works beautifully if you're keeping things gluten-free, and it has an even richer, smoother flavor profile that plays beautifully with the tuna.
Garlic, but not too much — one clove, minced so fine it almost disappears into the mixture. Fresh garlic here is non-negotiable; the powdered stuff creates a completely different flavor that tastes artificial and harsh. The garlic should enhance, not dominate, so if your clove is particularly large, use just half. When it hits the hot oil, it creates these little pockets of aromatic heaven that make your kitchen smell like a proper restaurant.
The Final Flourish
Mayonnaise in the mixture might seem odd, but it's the secret to moist, tender cakes that never dry out. Just a tablespoon adds richness and helps bind everything together. Don't use the low-fat stuff here — you need the real deal for proper texture and flavor. The mayo disappears into the mixture, so you won't taste it specifically, but you'll definitely notice the difference in the final texture. It's like insurance against dry, sad tuna cakes.
Salt and pepper — simple but crucial. The tuna needs seasoning to shine, but remember that soy sauce adds saltiness too. Start conservative, fry up a tiny test patty, and adjust from there. Black pepper should be freshly ground; the pre-ground stuff tastes like sawdust and adds nothing but heat without the complex aromatics. White pepper works too if you want a more subtle heat that doesn't add black specks to your beautiful cakes.
Everything's prepped? Good. Let's get into the real action...
The Method — Step by Step
- Start by creating your flavor base in a large mixing bowl. Drain your tuna like your life depends on it — I mean really press it out, because excess moisture is the enemy of crispy edges. Use the back of a spoon against the can lid, or better yet, wrap the tuna in cheesecloth and give it a gentle squeeze. Add the tuna to your bowl along with the minced garlic, soy sauce, and the white parts of your green onions. Mix gently with a fork, being careful not to overwork it — you want to maintain some nice flaky chunks of tuna for the best texture. The mixture should smell like the ocean met an Asian market and decided to become best friends.
- Now for the binding magic — beat your egg in a separate small bowl until it's completely homogeneous with no streaks of white or yolk visible. Pour it over your tuna mixture and add the arrowroot powder and mayonnaise. This is where most people mess up by adding everything at once and creating a gloopy mess. The arrowroot needs to be evenly distributed, so sprinkle it evenly across the surface rather than dumping it in one spot. Use your fork to gently fold everything together, turning the mixture over itself just until combined. Stop as soon as it holds together when pressed — overmixing leads to tough, rubbery cakes.
- Time for the crucial rest period that most recipes skip entirely. Cover your bowl with plastic wrap and let it chill in the refrigerator for at least 15 minutes, though 30 minutes is even better. This isn't just about being fussy — the rest allows the arrowroot to hydrate properly, the flavors to meld, and the mixture to firm up enough to form perfect patties. While you're waiting, this is the perfect time to make your spicy mayo by whisking together mayonnaise, lime juice, and sriracha in a small bowl. Start with less sriracha than you think you need — you can always add more, but you can't take away the heat once it's in there.
- Forming the patties is where technique really matters. Divide your chilled mixture into four equal portions — I use a half-cup measure to keep them consistent. Wet your hands slightly to prevent sticking, then gently form each portion into a patty about three inches wide and half an inch thick. Don't compact them too much — you want them to hold together, but still have some airiness. Place them on a parchment-lined plate and refrigerate again for 5 minutes while you heat your oil. This final chill helps them set up and prevents them from falling apart in the pan.
- Heat your oil mixture in a large non-stick or cast-iron skillet over medium heat. The combination of avocado oil and sesame oil gives you the perfect balance — avocado oil for its high smoke point and neutral flavor, sesame oil for that nutty aroma that screams Asian cuisine. You want about 1/8 inch of oil in the pan, enough to come halfway up the sides of your cakes. Test the temperature by dropping in a tiny crumb of the tuna mixture — it should sizzle enthusiastically but not violently. Too hot and you'll burn the outside before the inside heats through; too cool and you'll end up with greasy, soggy cakes.
- Set up your breading station with your gluten-free crumbs or panko in a shallow dish. Gently press each cake into the crumbs, coating both sides evenly but not too thickly — you're looking for a light jacket, not a heavy coat. The crumbs should adhere naturally thanks to the egg in the mixture. Carefully lower each cake into the hot oil, being mindful of splashing. They should sizzle immediately but not violently. Cook undisturbed for 3-4 minutes until the edges look golden and the bottoms are a deep amber color.
- The flip is where many good cakes go to die, but here's the foolproof method. Use a thin, flexible spatula and slide it all the way under the cake before attempting to flip. Don't be timid — commit to the flip with confidence. The well-chilled cakes should hold together beautifully. If one does break, don't panic — just push it back together in the pan and continue cooking. The second side usually needs slightly less time, about 2-3 minutes. While they finish cooking, sprinkle the remaining green onion tops over them for that fresh pop of flavor and color.
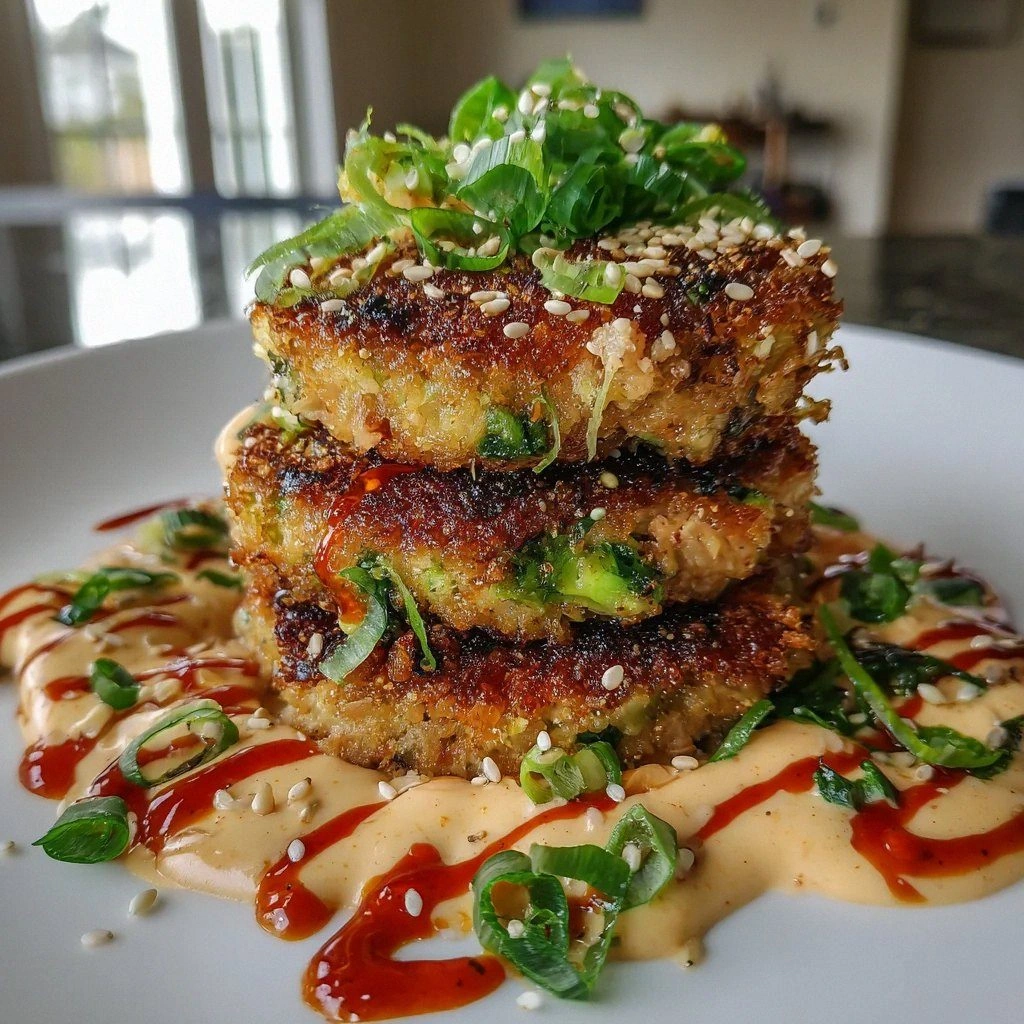
- Remove the finished cakes to a wire rack set over a baking sheet — this keeps them crisp while you finish any remaining batches. Resist the urge to drain on paper towels, which can make the bottoms steam and lose their crunch. Let them rest for at least 2 minutes before serving — this allows the interior to finish cooking from residual heat and prevents molten mouth burns. Serve them immediately with your spicy mayo on the side, or get fancy and pipe a little rosette on top of each cake. They should be golden brown, crispy at the edges, and smell like you want to dive face-first into the plate.
That's it — you did it. But hold on, I've got a few more tricks that'll take this to another level...
Insider Tricks for Flawless Results
The Temperature Rule Nobody Follows
Here's the thing about oil temperature — everyone's so worried about it being too hot that they almost always end up too low. You want that oil dancing at around 350°F, which is just below the point where it starts smoking. If you don't have a thermometer, drop in a small cube of bread — it should turn golden in about 60 seconds. Too fast and your oil's too hot, too slow and you need more heat. The right temperature creates that immediate sizzle that seals the outside, preventing the cakes from absorbing too much oil while developing those gorgeous crispy edges that make people fight over the last one.
Why Your Nose Knows Best
Trust your sense of smell more than any timer. When those cakes are perfectly done, your kitchen will fill with this intoxicating aroma of toasted sesame, garlic, and something slightly sweet from the caramelizing tuna. It's like your nose has a direct line to your appetite, and when it starts tingling with anticipation, you're usually about 30 seconds from perfection. I've tested this dozens of times, and every single time that smell hits, the cakes are ready to flip or remove. Your nose is more reliable than any kitchen timer ever made.
The 5-Minute Rest That Changes Everything
I know you're hungry and these smell incredible, but patience here is the difference between good and legendary. That 5-minute rest after cooking allows the steam trapped inside to redistribute, ensuring every bite is perfectly moist. It also lets the exterior crisp up even more as it cools slightly — the contrast between the crunchy outside and tender inside becomes even more pronounced. Plus, it prevents those dreaded mouth burns that ruin the eating experience. Trust me, I learned this the hard way after too many impatient moments that left me unable to taste anything for the rest of the meal.
The Double-Coat Secret
For extra-crispy cakes that would make a tempura master jealous, try the double-coat method. After your first coating of crumbs, let the cakes rest for 2 minutes, then give them a very light second coat. This creates these incredible flaky layers that shatter when you bite into them. It's an extra 2 minutes of work that transforms the texture from great to absolutely unforgettable. Just be gentle with the second coating — you're not trying to bread chicken here, just adding a whisper of extra crunch.
The Acid Balance Most People Miss
That spicy mayo needs balance, and most people go heavy on the sriracha without considering the acid component. Fresh lime juice isn't just for flavor — it actually helps cut through the richness of the mayonnaise and tuna, making each bite feel lighter and more refreshing. The acid also helps brighten all the other flavors, making the umami from the soy sauce pop and the garlic sing. Start with a teaspoon and add more to taste, but don't skip it entirely or your sauce will taste flat and one-dimensional.
Creative Twists and Variations
This recipe is a playground. Here are some of my favorite ways to switch things up:
The Thai Twist
Swap the soy sauce for fish sauce and add a tablespoon of red curry paste to the tuna mixture. Replace the lime juice in the mayo with rice vinegar and add a teaspoon of grated ginger. The result is a brighter, more aromatic cake with a complex heat that builds slowly. Top with fresh cilantro and a squeeze of lime for a completely different flavor profile that transports you straight to Bangkok street food heaven.
The Japanese-Inspired Version
Add a teaspoon of miso paste to the tuna mixture and replace half the mayonnaise with Kewpie mayo for extra umami richness. Mix some furikake into your panko for an incredible savory crunch. The spicy mayo becomes a yuzu-spiked aioli that's so good, you'll want to put it on everything. These have a more subtle, refined flavor that works beautifully as an elegant appetizer.
The Korean Fire Version
Double the garlic and add a tablespoon of gochujang to the tuna mixture for a deeper, fermented heat. The spicy mayo gets amped up with a teaspoon of sesame oil and some toasted sesame seeds. These have a slow-building heat that sneaks up on you, but the fermented complexity of the gochujang adds layers of flavor that keep you coming back for more. Serve with quick-pickled vegetables to cut through the richness.
The Mediterranean Mashup
Replace the soy sauce with a teaspoon of anchovy paste and add some chopped olives and sun-dried tomatoes to the mixture. Use lemon juice instead of lime in the mayo, and add some fresh herbs like dill and parsley. It's like a Niçoise salad met an Asian tuna cake and decided to become best friends. The briny, herbaceous notes work surprisingly well with the Asian technique.
The Breakfast of Champions
Add some finely chopped kimchi to the tuna mixture and serve these topped with a fried egg and extra spicy mayo for breakfast. The combination of protein, spice, and that runny egg yolk creates the ultimate hangover cure or weekend indulgence. It's like a breakfast sandwich had a beautiful baby with an Asian tuna cake, and honestly, it's life-changing.
The Mini Party Version
Form the mixture into tablespoon-sized balls instead of large cakes, roll them in panko, and deep-fry for 2-3 minutes until golden. Serve these as appetizers with the spicy mayo in a squeeze bottle for easy dipping. They're like the most sophisticated fish sticks you've ever tasted, and they disappear faster than you can fry them. Perfect for parties where you want to impress without spending hours in the kitchen.
Storing and Bringing It Back to Life
Fridge Storage
If you somehow have leftovers (I won't judge if you don't), these keep beautifully in the refrigerator for up to 3 days. Store them in an airtight container with a piece of parchment paper between layers to prevent them from sticking together. The key is letting them cool completely before refrigerating — trapping them while still warm creates condensation that ruins that gorgeous crispy exterior. They'll lose some crunch in the fridge, but a quick reheat brings them back to life.
Freezer Friendly
These freeze like absolute champions, making them perfect for meal prep or emergency deliciousness. Form the patties and freeze them uncooked on a parchment-lined baking sheet. Once solid, transfer to a freezer bag with parchment between layers. They'll keep for up to 2 months, and you can cook them straight from frozen — just add an extra minute or two per side. The texture actually improves slightly from freezing, as the ice crystals create even more crispy edges.
Best Reheating Method
Forget the microwave — that's how you end up with soggy, sad cakes that taste like regret. Instead, reheat them in a dry skillet over medium heat for 2-3 minutes per side until heated through and crispy again. Or pop them in a 400°F oven on a wire rack for 8-10 minutes. For the ultimate revival, use an air fryer at 375°F for 3-4 minutes. Add a tiny splash of water to the pan before covering with a lid for the last minute — it creates steam that reheats the interior without drying it out while keeping the exterior crisp.