I was standing in my kitchen, the clock ticking past midnight, when a frantic text from my roommate hit my phone: “Can you make bagels? I’m craving something that bites back!” I stared at the half‑finished sourdough starter on the counter, the pinkish‑white discard bubbling like a tiny volcano. My brain instantly connected the dots – what if that discard could become the backbone of a bagel that’s chewy on the inside, crisp on the outside, and carries a tangy depth that regular yeasted dough can only dream of? I grabbed the bowl, the flour, and a handful of optimism, and set out on a culinary quest that felt more like a daring experiment than a simple snack.
The kitchen was a symphony of sounds: the whirr of the stand mixer, the occasional pop of the starter as it released gas, and the faint hiss of the kettle as I boiled water for the bagels. The air smelled like warm wheat fields after a summer rain, with a whisper of honey that promised a subtle sweetness. My fingertips felt the dough’s resistance, a firm yet pliable texture that hinted at the glorious chew I was after. When the bagels finally puffed up in the boiling bath, the surface crackled like tiny fireworks, and the aroma that rose was nothing short of intoxicating – a blend of caramelized malt, sourdough tang, and a faint buttery sheen.
Most bagel recipes either rely on a heavy dose of commercial yeast or sacrifice texture for convenience. This version, however, leans on the natural power of sourdough discard, which gives each bite a complex, slightly acidic flavor that makes the crust sing. The secret? A short, high‑heat boil with a splash of baking soda that creates that signature glossy, chewy crust, and a final glaze of melted butter that adds a buttery richness without drowning the tang. I’ll be honest — I ate half the batch before anyone else got a chance to try it, and I dare you to taste this and not go back for seconds.
Ready for the game‑changer? In the next sections I’ll walk you through every single step — from the humble discard to the moment you pull those golden‑brown rings from the oven. By the end, you’ll wonder how you ever made bagels any other way. Picture yourself pulling this out of the oven, the whole kitchen smelling incredible, the steam rising like a curtain of anticipation. Let me walk you through every single step — by the end, you’ll wonder how you ever made it any other way.
What Makes This Version Stand Out
- Flavor Depth: The sourdough discard brings a subtle acidity that balances the honey and malt, creating a flavor profile that’s richer than any store‑bought bagel.
- Chewy Crust: A quick boil in water with baking soda creates that iconic glossy crust that cracks just enough to reveal a pillowy interior.
- Simplicity: No need for a long, multi‑day fermentation; the discard does the heavy lifting, cutting the prep time in half.
- Unique Twist: Adding barley malt syrup gives a caramel‑like undertone that most bagel recipes completely miss.
- Crowd Reaction: These bagels have a habit of disappearing within minutes of being placed on a cooling rack – they’re that good.
- Ingredient Quality: Using a high‑protein flour and a well‑fed discard ensures structure and flavor without extra additives.
- Cooking Method: The double‑step process – boil then bake – is the secret to that perfect chew.
- Make‑Ahead Potential: Freeze the unbaked rings and bake them straight from the freezer for a fresh‑out‑of‑the‑oven treat any day.
Inside the Ingredient List
The Flavor Base
The heart of this recipe is the sourdough discard. It’s the liquid gold that carries the wild yeast and bacteria, giving the bagels that signature tang. If you skip it, you lose the depth that makes these bagels sing; you’ll end up with a plain, one‑dim dough. I recommend using a discard that’s been fed within the last 12 hours for maximum activity. For a milder flavor, you can dilute it with a little extra water, but the boldness will be a touch less pronounced.
Next up is honey. It feeds the yeast, helps the crust brown, and adds a whisper of sweetness that balances the sourness. If you’re allergic or prefer a vegan version, maple syrup works just as well, though the flavor will shift toward a richer, caramel note.
The Texture Crew
All‑purpose flour (or bread flour for extra chew) provides the gluten network that traps the gases from the starter, giving the bagels their structure. Skipping the high‑protein flour will result in a softer, less chewy crumb – not the bagel experience you’re after. If you only have whole‑wheat flour, blend it 50/50 with all‑purpose to keep the crumb light while adding a nutty undertone.
Salt is not just seasoning; it tightens the gluten and controls fermentation speed. Too little, and the dough will spread out during boiling; too much, and the yeast will struggle. A good rule of thumb is 1‑2% of the flour weight – in this recipe that translates to a teaspoon.
The Unexpected Star
Barley malt syrup is the secret weapon that most bagel bakers overlook. It adds a deep, almost toasty sweetness that pairs beautifully with the sourdough tang. If you can’t find malt syrup, a tablespoon of dark brown sugar dissolved in a splash of water will mimic the flavor, though the texture may differ slightly.
Baking soda isn’t part of the dough; it’s added to the boiling water. The alkaline environment gives the crust that glossy, mahogany hue and a slightly crispy bite. Forgetting this step is a common mistake – the bagels will turn out pale and lack that signature “chewy” snap.
The Final Flourish
Butter glaze brushed on after baking adds a buttery sheen and a subtle richness that makes the crust irresistible. Skip it, and you’ll still have great bagels, but they’ll lack that luxurious mouthfeel. For a dairy‑free version, melt coconut oil with a pinch of sea salt and brush it on while the bagels are still hot.
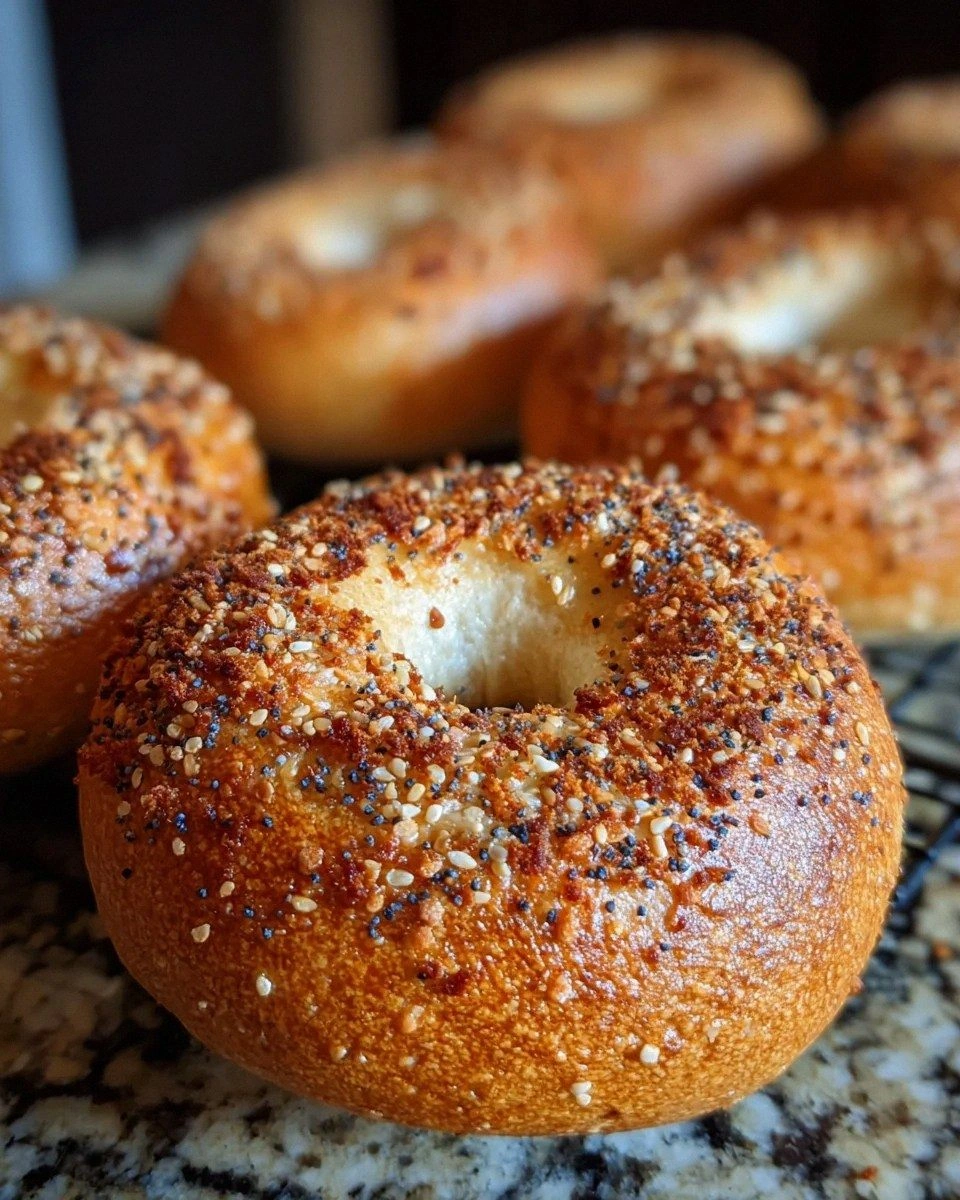
Toppings like sesame seeds, poppy seeds, or coarse sea salt are optional but highly recommended. They add texture, visual appeal, and a flavor burst. Lightly press the seeds into the wet dough before the final bake; they’ll stick like a dream.
Everything's prepped? Good. Let's get into the real action...
The Method — Step by Step
- Activate the Discard. In a large mixing bowl, combine 2 cups of all‑purpose flour with 1 cup of sourdough discard and 3/4 cup of warm water. Stir until a shaggy dough forms, then let it rest for 10 minutes – this autolyse period allows the flour to fully hydrate, making the dough easier to knead. You’ll notice the mixture becoming smoother, a sign that the gluten is starting to develop. Kitchen Hack: If you’re short on time, skip the autolyse and move straight to kneading – the bagels will still be delicious, just slightly less airy.
- Incorporate Flavor Boosters. Sprinkle 1 tsp salt, 1 tbsp honey, and 1 tbsp barley malt syrup over the dough. Add 1 tsp instant yeast if you want a faster rise (optional). Knead the mixture for about 8‑10 minutes by hand or with a stand mixer on low speed until the dough is smooth, elastic, and pulls away from the sides of the bowl. The dough should feel tacky but not sticky; if it sticks to your fingers, sprinkle a tiny bit more flour.
- First Rise. Transfer the dough to a lightly oiled bowl, cover with a damp towel, and let it rise in a warm spot for 45‑60 minutes, or until it’s roughly doubled in size. This is the moment where the sourdough and yeast work together, creating those airy pockets you’ll later feel as chew. If the kitchen is cool, extend the time by 15‑20 minutes – patience pays off.
- Shape the Bagels. Punch down the dough gently to release excess gas, then divide it into 8 equal pieces (about 100‑110 g each). Roll each piece into a smooth ball, then poke a hole through the center with your thumb and gently stretch the hole to about 2‑3 inches in diameter. The dough should stretch without tearing; if it resists, let it rest for a couple of minutes and try again. Place the shaped rings on a parchment‑lined tray, cover, and let them rest for 15 minutes – this short bench rest relaxes the gluten, making the final boil smoother.
- Boiling Bath Prep. While the bagels rest, bring a large pot of water to a rolling boil. Add 1 tsp baking soda (it will bubble up vigorously – that’s normal). The alkaline water will give the crust that classic mahogany color and a slight crispness. Watch Out: Adding the baking soda too early can cause the water to overflow; add it once the pot is already boiling.
- Boil the Bagels. Gently lower 2‑3 bagels at a time into the boiling water. Boil for 30 seconds on the first side, then flip and boil for another 30 seconds. For an extra chewy crust, extend the second side to 45 seconds. You’ll hear a faint hiss as the surface gelatinizes – that’s the magic happening. Using a slotted spoon, remove the bagels and let them drain on a clean kitchen towel. This step is the heart of the chew factor – don’t skip it.
- Apply Toppings. While the bagels are still wet, lightly brush them with melted butter (or coconut oil for a dairy‑free version). Sprinkle your chosen toppings – sesame, poppy, or a pinch of coarse sea salt – and gently press them in. The butter helps the seeds adhere and adds a glossy finish that makes the bagels look as good as they taste.
- Bake to Perfection. Preheat your oven to 425 °F (220 °C). Arrange the boiled bagels on a parchment‑lined baking sheet, leaving a little space between each. Bake for 15‑18 minutes, or until the tops are a deep golden‑brown and the crust feels firm to the touch. The interior should be airy and slightly springy – that’s the chew you’ve been waiting for. If you like an even darker crust, switch the oven to broil for the last 2 minutes, but keep a close eye to avoid burning.
- Cool and Serve. Transfer the baked bagels to a wire rack and let them cool for at least 10 minutes before slicing. This short rest lets the crumb set, ensuring each bite has that perfect snap. Slice them open, toast if desired, and slather with cream cheese, avocado, or your favorite spread. That first bite? Absolute perfection. Kitchen Hack: Store uncooled bagels in a paper bag for 30 minutes; the paper absorbs excess moisture, keeping the crust crisp.
That's it — you did it. But hold on, I've got a few more tricks that'll take this to another level...
Insider Tricks for Flawless Results
The Temperature Rule Nobody Follows
Never bake bagels in a cold oven. Starting at a high temperature (425 °F) creates an initial “oven spring” that expands the interior before the crust sets. If you preheat your oven too low, the bagels will spread and lose that iconic chew. I once tried a 350 °F bake and ended up with soggy, flat discs – a total disappointment. Trust the heat; it’s the secret to that puffed‑up interior.
Why Your Nose Knows Best
Your sense of smell is a reliable indicator of doneness. When the bagels hit that caramel‑brown scent, you’re within seconds of perfect. If you can’t smell that toasty aroma, give them another minute. Over‑baking turns the crust brittle, while under‑baking leaves it gummy. Follow your nose, not just the timer.
The 5‑Minute Rest That Changes Everything
After shaping, let the bagels rest for exactly 5 minutes before the boil. This short pause relaxes the gluten, preventing the holes from collapsing during the boiling stage. A friend once skipped this rest and ended up with bagels that split open in the pot – a sad, soggy mess. The 5‑minute rest is a tiny window that yields a massive payoff.
Butter Glaze vs. Egg Wash
Many bakers reach for an egg wash to add shine, but butter glaze delivers flavor plus a subtle sheen without the eggy taste. Melt 2 tbsp butter, brush it on hot bagels, and watch the crust turn buttery gold. If you prefer a glossy finish without added fat, a light brush of milk works, but you’ll miss that buttery depth.
Steam Is Your Secret Weapon
Place a shallow pan of hot water on the oven floor during the first 5 minutes of baking. The steam keeps the crust from forming too quickly, allowing the interior to expand fully. This technique is why professional bakeries achieve that perfect chew. Remember to wipe up any excess water after the first half of the bake to avoid a soggy bottom.
Creative Twists and Variations
This recipe is a playground. Here are some of my favorite ways to switch things up:
Cinnamon‑Sugar Morning Bliss
Swap the savory toppings for a generous coating of cinnamon mixed with brown sugar. Brush the boiled bagels with melted butter, then roll them in the sweet mixture before baking. The result is a breakfast treat that pairs perfectly with coffee.
Everything Bagel Remix
Combine sesame, poppy, dried minced onion, dried garlic, and coarse sea salt for the classic “everything” topping. Press the blend into the wet dough after boiling for a flavor explosion that’s both savory and aromatic.
Cheddar Jalapeño Kick
Stir 1 cup shredded sharp cheddar and 1 finely chopped jalapeño into the dough before the first rise. The cheese melts into the crumb, while the jalapeño adds a subtle heat that wakes up the palate.
Whole‑Wheat Nutty Delight
Replace half of the all‑purpose flour with whole‑wheat flour and add 2 tbsp toasted chopped walnuts. The nutty flavor and extra fiber make these bagels a wholesome snack that still holds that chewy core.
Herb‑Infused Olive Oil Drizzle
After baking, drizzle the bagels with a mixture of extra‑virgin olive oil, minced rosemary, and a pinch of sea salt. The herb‑infused oil adds a Mediterranean flair that’s perfect for bruschetta or as a side to soups.
Storing and Bringing It Back to Life
Fridge Storage
Place cooled bagels in an airtight container with a paper towel to absorb excess moisture. They’ll stay fresh for up to 4 days. If you notice the crust softening, pop them in a 350 °F oven for 5 minutes to revive the chew.
Freezer Friendly
Freeze unbaked, boiled bagels on a tray, then transfer to a zip‑lock bag. When you’re ready, bake them straight from the freezer at 425 °F for 20‑22 minutes. The result mimics fresh‑out‑of‑the‑oven texture without any quality loss.
Best Reheating Method
To reheat, sprinkle a tiny splash of water on the bagel surface, then warm in a preheated 350 °F oven for 5‑7 minutes. The steam created by the water revives the crust’s crunch while keeping the interior tender. Microwaving is a no‑no if you want to preserve that signature chew.