Picture this: I was halfway through a frantic dinner party, the clock ticking, guests hovering like moths around a flickering bulb, and my dessert dreams were evaporating faster than the steam on my stovetop. I had promised a “show‑stopper” that would make everyone forget the soggy salad I’d tossed earlier, but all I had in the fridge were a handful of ripe strawberries and a lonely block of cream cheese. I stared at those glossy red jewels and thought, “What if I could turn these into something that looks as fancy as a pâté, tastes like a cloud, and still screams summer?” That night, I invented what I now call Deviled Strawberries: Creamy, Dreamy Cheesecake Bites, and let me tell you, it was a revelation that made the whole house smell like a bakery on a sun‑kissed patio.
The moment I sliced the first strawberry in half, the aroma of fresh fruit burst into the air, mingling with the faint, buttery whisper of graham cracker crumbs I’d toasted earlier. I could hear the faint crackle of the crust setting in the pan, the soft sigh of the cream cheese softening as it warmed to room temperature, and my own heartbeat syncing with the rhythm of the kitchen. The texture under my fingertips was a perfect blend of firm yet yielding – the strawberry’s skin giving way to a juicy interior, ready to cradle a silky filling that felt like a whisper of cheesecake. My tongue tingled at the anticipation, and I knew I was onto something that would outshine any store‑bought dessert on the market.
Most strawberry “deviled” recipes out there either drown the fruit in a sugary glaze or hide the berries beneath a cloying frosting that masks their natural flavor. This version flips the script by stuffing the strawberries with a light, airy cheesecake mousse that’s balanced with just a hint of lemon and vanilla, letting the fruit’s bright acidity shine through. The secret? A dash of sour cream that adds a subtle tang, and a careful folding technique that keeps the mixture from turning heavy. I dare you to taste this and not go back for seconds – it’s hands down the best version you’ll ever make at home.
Let me walk you through every single step — by the end, you’ll wonder how you ever made it any other way. Okay, ready for the game‑changer? This next part? Pure magic.
What Makes This Version Stand Out
- Texture: The filling is airy yet stable, hugging the strawberry like a silk scarf that never slips.
- Flavor Balance: Lemon juice cuts through the richness, while vanilla adds warmth, creating a symphony on the palate.
- Simplicity: Fewer than ten ingredients, no fancy equipment, and under an hour from start to finish.
- Uniqueness: Unlike typical “deviled” treats, these are sweet, tangy, and have a cheesecake heart that surprises every bite.
- Crowd Reaction: Guests gasp, Instagram stories explode, and the “What’s that?” question becomes a repeat chorus.
- Ingredient Quality: Using full‑fat cream cheese and heavy cream creates a luxurious mouthfeel you can’t fake.
- Make‑Ahead Potential: Assemble the night before, chill, and you’re ready to wow at any party.
- Seasonal Pride: Fresh strawberries in June make this dish feel like a celebration of the season.
Inside the Ingredient List
The Flavor Base
Cream Cheese (8 oz): This is the backbone of our mousse, providing that classic cheesecake tang and buttery richness. If you skimp on quality, the whole bite feels cheap – I always reach for a brand that’s smooth and slightly tangy. In a pinch, you can substitute a blend of mascarpone and a spoonful of Greek yogurt, but the texture will shift toward a denser custard.
Heavy Whipping Cream (1 cup): The cream’s high fat content is what gives the mousse its cloud‑like lift when whipped. Over‑whipping turns it into butter, so keep an eye on the peaks – they should be soft and glossy. If you’re dairy‑free, coconut cream can work, but expect a faint coconut note that might clash with the lemon.
Sour Cream (½ cup): This adds a subtle tang that balances the sweetness of the strawberries and sugar. Skipping it makes the filling overly sweet and heavy. For a lighter version, you can use Greek yogurt, but the flavor will be a bit more “yogurty.”
The Sweeteners & Accents
Granulated Sugar (¼ cup): Just enough to sweeten without overwhelming the natural berry flavor. You can swap for powdered sugar for a smoother texture, but keep the amount the same. If you prefer less sugar, reduce to 2 tablespoons and let the strawberries do the sweet talking.
Vanilla Extract (1 tsp): Pure vanilla adds depth, turning the simple sweetener into a fragrant backdrop. Avoid imitation vanilla – it can taste flat and cheap. A dash of bourbon or almond extract can add a sophisticated twist if you’re feeling adventurous.
Lemon Juice (1 tbsp): The acidity brightens the mousse and prevents it from feeling cloying. Freshly squeezed juice is a must; bottled lemon juice adds a metallic note that ruins the balance.
The Unexpected Star
Graham Cracker Crumbs (¼ cup): These crumbs create a buttery, slightly crunchy base that contrasts the creamy interior. Toast them lightly for a nutty aroma that elevates the overall flavor. If you’re gluten‑free, use crushed gluten‑free cookies or toasted oat flakes.
The Final Flourish
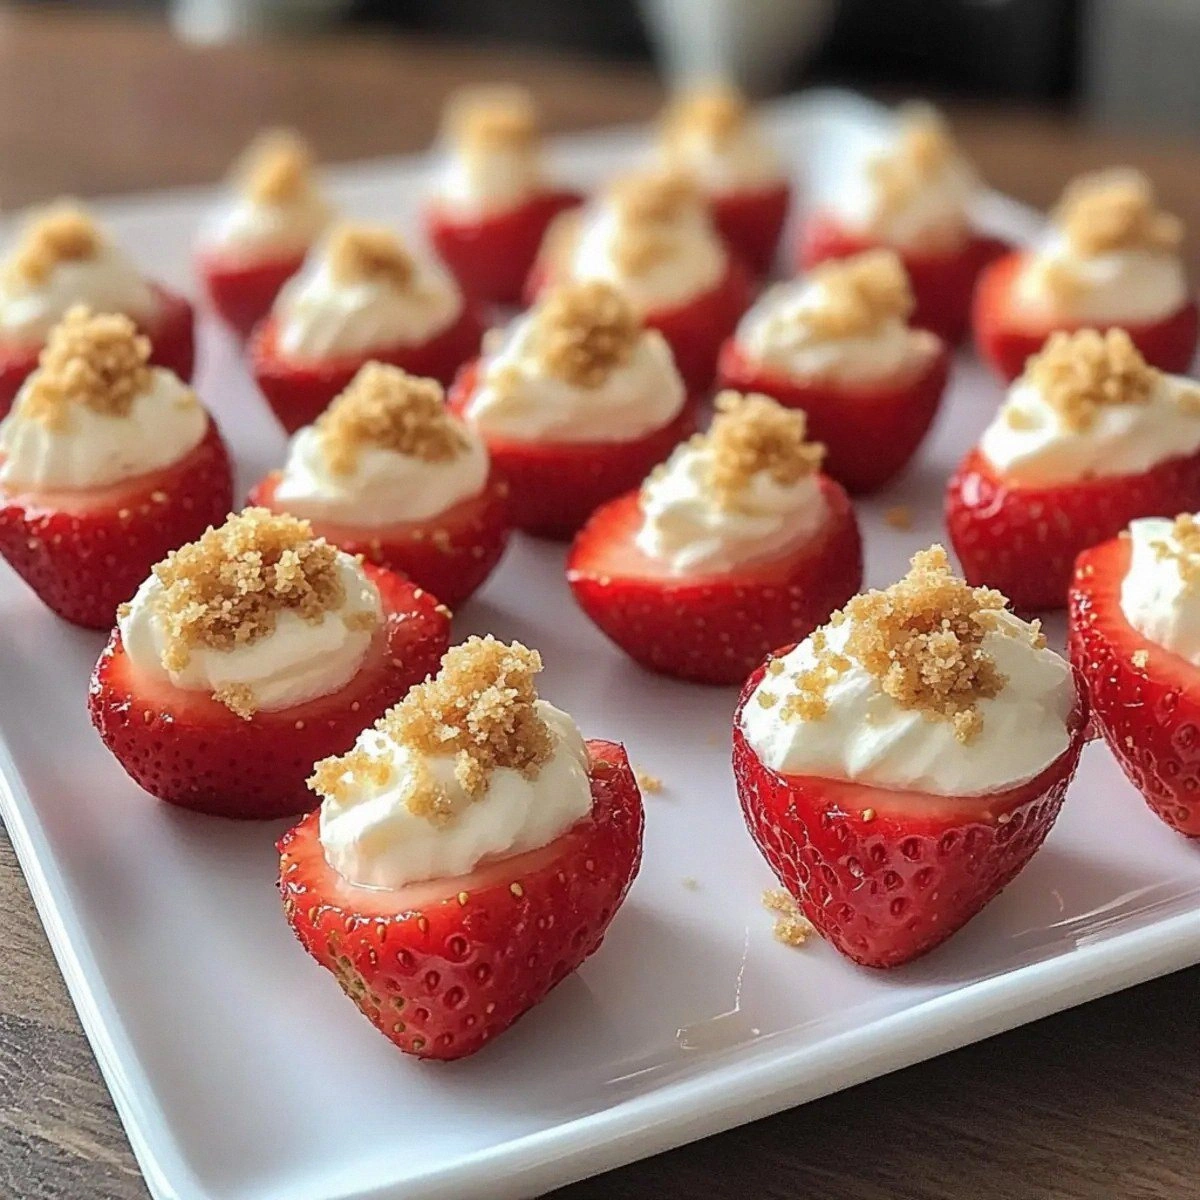
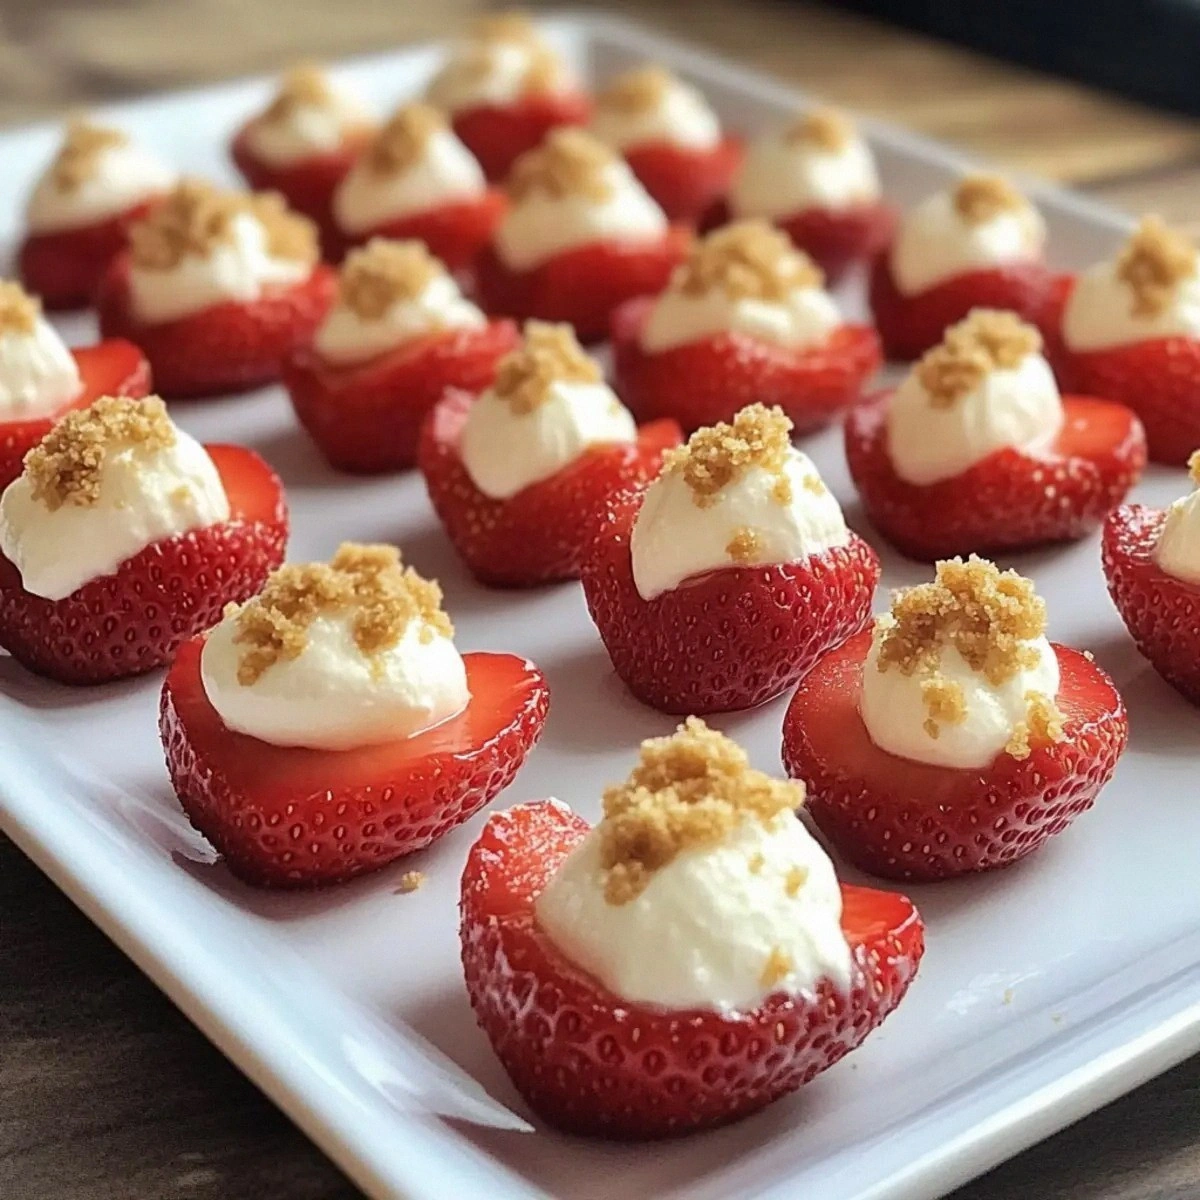
Strawberries (12 large): Choose berries that are firm, bright red, and fragrant – they’re the vessel for our dreamy filling. If you can’t find large strawberries, you can halve smaller ones, but the visual impact is reduced. When selecting, give each berry a gentle squeeze; it should yield slightly, indicating ripeness without being mushy.
Everything's prepped? Good. Let's get into the real action...
The Method — Step by Step
-
Start by washing the strawberries under cool running water, then pat them dry with a clean kitchen towel. Slice each strawberry lengthwise, being careful not to cut all the way through – you want a hinge that stays attached. Scoop out the core with a small spoon or a melon baller, creating a neat cavity that’s ready to be filled. The hollow should be about a tablespoon deep; if it’s too shallow, the filling will spill out.
Kitchen Hack: Freeze the strawberries for 10 minutes before hollowing – the flesh firms up, making it easier to scoop without crushing the skin. -
In a medium mixing bowl, combine the softened cream cheese, sour cream, and granulated sugar. Use a hand mixer on medium speed until the mixture is smooth, glossy, and free of lumps – think of the consistency of a well‑whipped frosting. Add the vanilla extract and lemon juice, then give it another quick pulse to blend the flavors evenly. At this point, the mixture should smell bright and buttery, a signal that the base is ready.
-
In a separate chilled bowl, pour the heavy whipping cream and whip it on high until soft peaks form. This takes about 2‑3 minutes; you’ll notice the cream thickening and holding its shape without becoming grainy. Gently fold the whipped cream into the cream cheese mixture using a spatula, turning the bowl over and over to keep the air trapped. This step is crucial – over‑mixing will deflate the mousse, and you’ll lose that dreamy lightness.
Watch Out: If the cream cheese is too cold, it will create lumps that are impossible to smooth out later. Let it sit at room temperature for 20‑30 minutes before mixing. -
Now, gently spoon the mousse into a piping bag fitted with a large star tip. If you don’t have a piping bag, a zip‑top bag with a corner snipped off works just fine. Pipe the mousse into each strawberry cavity, filling it just to the brim. The star tip creates a decorative swirl that adds visual flair – trust me, it looks as good as it tastes.
-
While the strawberries are being filled, toast the graham cracker crumbs in a dry skillet over medium heat for 2‑3 minutes, stirring constantly. You’ll hear a gentle sizzle and smell a toasty, buttery aroma that signals they’re perfectly golden. Transfer the crumbs to a shallow dish and let them cool.
-
Once all strawberries are filled, roll the tops in the toasted graham cracker crumbs, pressing lightly so the crumbs adhere to the mousse. This adds a satisfying crunch that contrasts the silky interior. If you prefer a cleaner look, you can sprinkle the crumbs on top instead of rolling.
Kitchen Hack: For an extra‑crunchy coating, mix the crumbs with a teaspoon of melted butter before rolling – the crumbs will cling better and toast to a richer hue. -
Arrange the finished bites on a chilled serving platter, then refrigerate for at least 30 minutes. This chilling time lets the mousse set, making each bite firm enough to handle without spilling. The fridge also intensifies the flavors, allowing the lemon and vanilla notes to meld with the strawberry’s natural sweetness.
-
Just before serving, give each strawberry a final dusting of powdered sugar for a snow‑kissed finish, and garnish with a tiny mint leaf if you like. The result? A bite‑size masterpiece that looks like a miniature cheesecake nestled in a ruby‑red shell. Picture yourself pulling this out of the fridge, the whole kitchen smelling incredible, and watching guests' eyes widen in delight.
That's it — you did it. But hold on, I've got a few more tricks that'll take this to another level...
Insider Tricks for Flawless Results
The Temperature Rule Nobody Follows
Never, ever whisk cream cheese straight from the fridge. Let it soften at room temperature for at least 20 minutes; this prevents gritty pockets in the mousse. I once tried to speed things up by microwaving it for 10 seconds – the result was a melted mess that ruined the texture. Trust the clock, not the microwave.
Why Your Nose Knows Best
When the mousse is perfectly mixed, you’ll notice a faint buttery aroma with a hint of citrus. If you smell a sour or “off” note, it means the cream cheese may be past its prime. Your nose is a better indicator than a timer, so pause and sniff before moving on.
The 5‑Minute Rest That Changes Everything
After piping the mousse, let the filled strawberries sit at room temperature for five minutes before rolling them in crumbs. This brief rest allows the mousse to firm up just enough to hold the crumbs without sliding off. Skipping this step leads to crumb loss and a soggy appearance.
Crumb Coating Consistency
Mix the graham cracker crumbs with a dab of melted butter for a glossy, adhesive coating. The butter not only helps the crumbs stick but also adds a subtle richness that complements the cheesecake flavor. If you forget the butter, a light spray of cooking oil works in a pinch.
Serving Temperature Matters
Serve the bites chilled but not ice‑cold. Pull them out of the fridge about 10 minutes before plating; this brings out the full flavor profile and prevents the mousse from feeling too firm. I once served them straight from the freezer – the texture was rock‑hard, and the flavor was muted.
Creative Twists and Variations
This recipe is a playground. Here are some of my favorite ways to switch things up:
Chocolate‑Covered Dream
Dip the tops of the filled strawberries in melted dark chocolate before rolling them in crumbs. The bitter chocolate pairs beautifully with the sweet mousse, and the visual contrast looks stunning on a dessert board.
Nutty Crunch
Swap graham cracker crumbs for finely chopped toasted almonds or pistachios. The nutty flavor adds depth, and the green‑ish hue of pistachios makes for an eye‑catching garnish.
Coconut Bliss
Replace the graham cracker crumbs with toasted coconut flakes and add a splash of coconut milk to the mousse. This gives a tropical twist that’s perfect for summer soirées.
Berry Medley
Use a mix of strawberries, raspberries, and blueberries, each filled with the same cheesecake mousse. The different colors create a rainbow effect, and the varied berry flavors keep every bite interesting.
Spiced Autumn
For a fall version, add a pinch of ground cinnamon and nutmeg to the mousse, and sprinkle a dusting of pumpkin spice on top. Pair with a drizzle of caramel for a cozy, comforting bite.
Mini Cheesecake Cups
Instead of using strawberries as vessels, line a mini muffin tin with silicone cupcake liners, fill with a thin layer of graham crust, then top with the mousse and a fresh berry. These bite‑size cups are perfect for cocktail parties.
Storing and Bringing It Back to Life
Fridge Storage
Place the assembled bites in an airtight container, layering a sheet of parchment paper between layers to prevent sticking. They stay fresh for up to 3 days, retaining their texture and flavor. If you notice condensation, gently pat the tops with a paper towel before serving.
Freezer Friendly
These bites freeze wonderfully. Arrange them on a baking sheet lined with parchment, freeze until solid, then transfer to a zip‑top freezer bag. They’ll keep for up to 2 months. When you’re ready to serve, move them to the fridge for a few hours to thaw.
Best Reheating Method
While they’re best served chilled, if you prefer a slightly warmed bite, place the strawberries on a plate, add a tiny splash of water (about a teaspoon), and microwave for 10‑12 seconds. The water creates steam that revives the mousse without melting it, giving a luscious, velvety mouthfeel.